Robot Vacuum Brush Jam Decision Tree
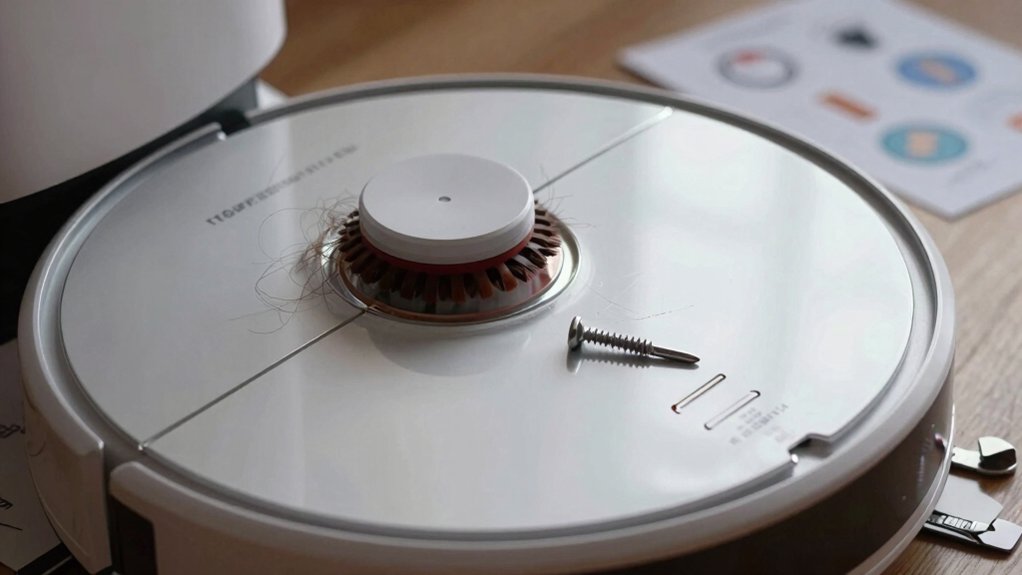
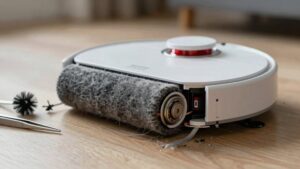
Start by visually checking the cleaning head for hair or debris and spin the brush roll manually to spot binding. If it’s stuck, pop out the roll using the quick‑release: push the left end, lift per the arrow, and then remove the right cover.
Cut and pull away tangles; probe behind end caps for hidden lint. Reinsert with the orange tip aligned until it clicks. Test rotation and run briefly. Follow the full decision tree below for deeper troubleshooting.
Quick Overview
- Visually inspect the brush roll and remove visible hair, string, or debris before further disassembly.
- Manually spin the brush roll; gritty, stalled, or binding rotation indicates hidden obstructions needing deeper inspection.
- Remove the brush roll per arrows; align the orange-tipped end with the orange socket and expose the hexagonal tip for proper reassembly.
- Open the right-side cover and end caps to cut away compacted lint from the shaft, bristles, and behind guards.
- Reinsert until a click; confirm free manual rotation. Then run a short test cycle and stop if resistance, noise, or vibration recurs.
Quick Diagnosis: What to Check First
Where should you start when your robot reports a brush jam? You begin a quick diagnosis by visually inspecting the cleaning head for wrap or obstructions around the brush roll and removing any visible entanglement. Don’t guess; look for hair, string, or debris that prevents rotation.
Next, push on the left end of the brush roll (as you face the robot) to release it. Then, follow the arrow to pull up and remove the brush roll for closer inspection. Check the right side of the brush roll specifically for tangles and clear any material that could obstruct rotation.
Before reinserting, verify the orange-tipped end and the matching orange end on the robot align correctly. Reassemble by gently inserting until you feel a click. Then, spin the brush roll to confirm free rotation. Finally, ensure the cleaning head is securely closed before resuming operation.
These steps give you a fast, systematic path to resolve a brush jam.
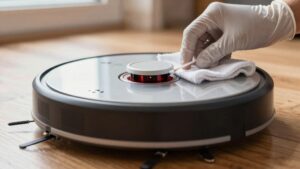
Remove the Cleaning Head and Free the Brush Roll
After you’ve inspected the cleaning head for obvious wrap and tried the quick-release push on the left end, open the cleaning head fully and remove the brush roll for a closer look. You’ll follow a concise removal procedure: push the left end inward, then pull up following the arrow. Extract the right side next to clear tangles and check for debris that blocks rotation. Handle parts gently to avoid damaging tips.
- Confirm release: push left end, lift brush roll per arrow; remove right side to access debris and tangles.
- Alignment verification on reinsert: align the orange-tip end with the right-hand orange socket; ensure the hexagonal tip is visible.
- Final check: slide the white tip into the left side until you hear a click; spin the brush roll to verify free rotation and that the cleaning head closes securely.
This procedure isolates mechanical causes before deeper obstruction removal.
Remove Tangles and Inspect for Hidden Obstructions
How will you know if hidden debris is still blocking the brush roll? You’ll spot residual obstruction when rotation feels gritty, stalls, or binds during a manual spin. Remove the right-side cover to expose the brush circumference; cut or pull away hair, threads, and compacted lint from the shaft and bristles.
Probe behind end caps and under guards. Small pebbles, string ends, or accumulated dust often lodge there and create a persistent brush risk.
Work methodically: follow a maintenance checklist that lists cover removal, visible debris removal, end-cap inspection, guard clearing, and a manual-rotation test. After clearing each area, rotate the roll by hand and note smoothness, resistance, or clicking.
If the roll still resists, recheck under guards and along the shaft; hidden shards or woven threads can remain. Only proceed to reassembly once free rotation is confirmed; that ensures you’ve removed tangles and eliminated concealed obstructions that cause repeat jams.
Reinsert and Align the Brush Roll Correctly
Once the brush roll spins freely, align the orange-tipped end with the matching orange socket on the robot and insert it so the hexagonal tip becomes visible, confirming proper orientation. You’ll perform reinsert alignment deliberately: cover the circular bit in the cleaning head to protect internals. Then, position the orange end and slide the white-tip into the left side following the arrow. Continue until you feel a definite click.
- Confirm brush orientation: hexagonal tip visible at insertion, orange-to-orange mating, white tip seated left.
- Protect mechanisms: cover the circular opening before final insertion to prevent debris contact and misalignment.
- Verify mechanical engagement: advance until the click; then spin the roll manually to ensure free rotation without obstruction.
You’ll avoid forcing parts. Proper reinsert alignment and clear brush orientation ensure reliable engagement, minimize wear, and prevent repeat jams before you close the cleaning head.
Test the Brush Roll, Resume Cleaning, and When to Seek Service
If the brush roll clicks into place and spins freely by hand, close the cleaning head, press play, and watch the first rotations closely for any resistance or unusual noise that would indicate misalignment or an obstruction.
After you reinsert brush components and confirm the white tip is seated following the arrow, test brush rotation manually to verify unobstructed movement. Close the head completely; then resume cleaning and observe the initial cycles for abnormal resistance, vibration, or scraping sounds.
If you detect binding on startup, stop immediately. Open the head and recheck alignment and clearance around the roll; do not resume until rotation is free.
If manual spinning fails after reseating, repeat reinsert brush steps, ensuring the tip clicks and the roll spins before powering on. If issues persist despite correct installation and inspection, seek service to diagnose possible internal obstructions or damaged components rather than continuing operation and risking further damage.
Frequently Asked Questions
How Often Should I Lubricate the Brush Bearings?
You should lubricate the brush bearings every 3–6 months. That lubrication frequency balances brush bearing wear and operation. If you run the vacuum daily or notice noise, reduce the interval to three months.
Use a light machine oil sparingly; clean bearings before applying and avoid overlubrication that attracts debris. Track performance and inspect bearings during filter or brush replacement. Adjust lubrication frequency based on visible wear or increased friction.
Can Pet Hair Cause Motor Damage Over Time?
Yes, pet hair can cause motor wear over time. If hair accumulates around the brush, bearings, or motor vents, it raises friction and heat. This forces the motor to work harder and shortens its lifespan.
You should clean the brush and bearings frequently, clear hair from vents, and monitor motor temperature and noise. Regular maintenance prevents excessive wear, preserves suction, and reduces the risk of overheating or premature motor failure.
Are Replacement Brush Rolls Model-Specific?
Yes, replacement brush rolls are usually model-specific. You’ll need to check replacement compatibility by matching part numbers, model series, and connector types before buying. Using the wrong roll can impair suction, wear bearings, or void warranty.
For reliable performance, follow brush maintenance guidelines. Clean bearings, trim hair buildup, and replace with OEM or verified compatible parts. That keeps cleaning efficiency high and reduces the risk of motor strain.
Will Warranty Cover Damage From a Jam?
Sometimes, it depends. You’ll need to check warranty coverage terms and proof of proper use. Manufacturers often exclude jam damage caused by misuse, debris, or aftermarket parts.
If the jam resulted from a defect in materials or workmanship, the warranty may cover repairs or replacement. Document the issue, keep receipts, and contact support promptly. Be ready to show photos and describe maintenance steps to increase your claim’s success.
Can I Use Third-Party Brushes Safely?
You can, but cautiously. Third-party brushes vary in brush compatibility and quality, so verify fit, materials, and balance before buying. Poorly matched brushes increase wear, jam risk, and void warranties.
Inspect brushes after installation and adjust maintenance frequency: clean more often if debris collects or performance drops. Track vibration and noise; switch back to OEM if problems appear. Prioritize reputable aftermarket brands with clear compatibility specs and return policies.
Conclusion
You’ve walked through quick checks, removing the cleaning head and freeing the brush roll to spot obvious tangles or hidden debris. After clearing obstructions and inspecting bearings, reinsert and align the roll precisely so it seats and spins freely.
Run a brief test cycle and observe performance. If the brush still jams, stop and contact support or a technician. Don’t force operation; further use could damage the motor or drivetrain.