Virtual Wall Vs No-Go Zones Explained
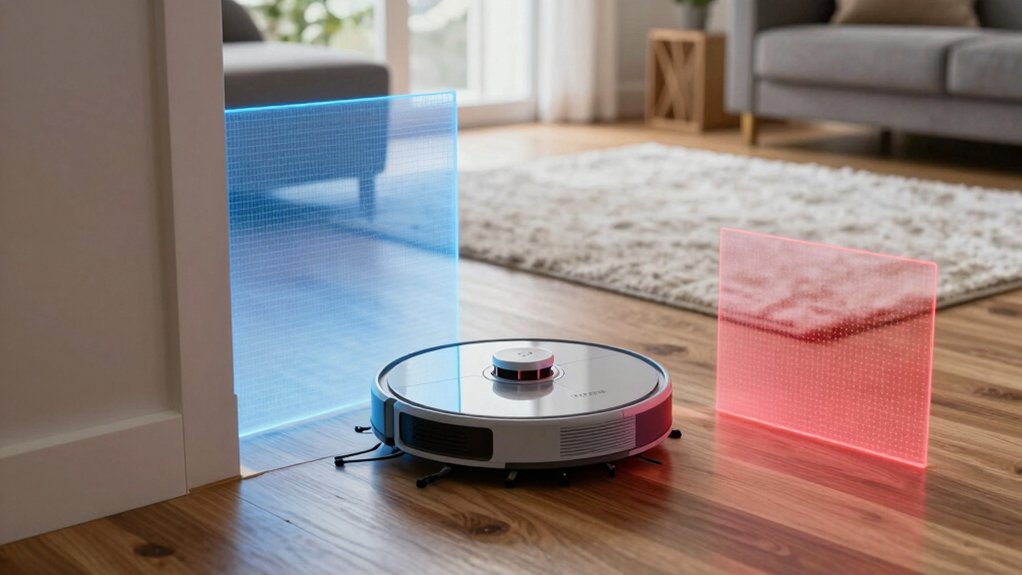
You’ll pick a Virtual Wall when you need a quick, temporary digital barrier. You draw software lines on the map to block paths without physical hardware. This is useful for cables or chairs and is editable in real time but dependent on a valid map.
Use No‑Go Zones for persistent exclusions like pet beds or stairs; they’re saved polygonal areas the robot won’t enter across reboots. Keep maps stable and you’ll get reliable behavior. Keep going to learn setup and fixes.
Quick Overview
- Virtual Walls are drawn lines on a map to block traversal temporarily without physical barriers.
- No-Go Zones are polygonal map areas marked permanently off-limits until reconfigured.
- Virtual Walls depend on current map validity and may fail if the map drifts or changes.
- No-Go Zones persist through reboots; they are better for long-term exclusions like pet areas or stairs.
- Use Virtual Walls for short-term obstacles and No-Go Zones for stable, safety-critical restrictions.
Quick Answer: Virtual Wall Or No‑Go Zone?
Want a quick rule of thumb? You’ll pick a Virtual Wall when you need flexible, temporary restrictions and a No-Go Zone when you require absolute, permanent exclusion.
Virtual Walls are software lines you draw to block traversal along specific paths; they’re editable in real time and ideal for short-term needs or to avoid cables and chairs. No-Go Zones are fixed map regions that the vacuum won’t enter under any circumstance until you update the map. Use them for sensitive areas like pet spaces or fragile furniture.
Don’t confuse the two: Virtual Walls are advisory lines, not absolute barriers, and can be ambiguous if you rely on them for critical protection. Similarly, avoid non-adaptive content in your setup; don’t treat Virtual Walls as permanent solutions.
Both let you place multiple boundaries (some models limit you to ten), but choose based on permanence and strictness: temporary, editable line versus absolute, map-locked area.
What Is a Virtual Wall and When to Use It
Curious how a Virtual Wall works? You draw software boundaries on the robot’s map via the app; they act as invisible lines or shapes the robot won’t cross, not physical barriers. Use them when you need precise, temporary control over access without moving furniture.
- Block fragile furniture zones quickly using the app
- Draw straight lines or custom shapes for clutter-prone areas
- Create up to 10 zones per map for targeted control
- Adjust and save zones in real time as you refine remote mapping
You’ll manage Virtual Walls through the map interface. This saves configurations that persist until you change them. They’re ideal when you want flexible, software-driven control—especially for short-term needs or experiments. Remember they depend on the current map’s validity; if the environment changes or the map’s invalidated, re-map and update your Virtual Walls to keep navigation accurate and efficient.
What Is a No‑Go Zone and When to Use It
If Virtual Walls let you draw temporary lines or shapes to steer the robot, No‑Go Zones keep it out of areas entirely. You create them in the app’s map settings (often called No‑Go or Keep‑Out Zones); most systems allow up to 10 per map. They’re software boundaries that block entry under all circumstances. You can protect delicate furniture, pet bowls, stairs, or cables regardless of cleaning mode. This is unlike No‑Mop Zones, which only apply when a mopping pad is installed.
Use No‑Go Zones when you need a persistent safeguard rather than a passable guideline. Remember common no go zone misconceptions: they’re not physical barriers and can be invalidated if the map resets or the room changes. After moving furniture or renovating, reconfigure zones and account for map restoration processes. This ensures the robot’s map and protections remain accurate.
Place zones conservatively around high‑risk spots and review them periodically to keep coverage reliable.
Virtual Wall vs No‑Go Zone : Key Differences
How do Virtual Walls and No‑Go Zones differ in practice? You’ll choose based on precision, persistence, and map reliability. Virtual Walls draw straight software lines that deter crossing; No‑Go Zones create full-area blocks that prevent entry. Consider prospective collaborations or pricing comparisons when deciding features across models.
- Shape: Virtual Walls = straight lines; No‑Go Zones = custom, irregular areas.
- Persistence: Virtual Walls can be disabled if the map becomes invalid. No‑Go Zones persist as highlighted blocks until you reconfigure them.
- Flexibility: Virtual Walls re-route with updated mapping data. No‑Go Zones need explicit redefinition after furniture moves or map changes.
- Quantity: Both support multiple boundaries (up to 10 per map) managed in the app’s map settings.
- Use case: Pick Virtual Walls for linear barriers (doorways, thresholds). Pick No‑Go Zones for sensitive or complex areas (pet beds, play areas).
This comparison keeps you focused on technical trade‑offs without overlapping setup instructions.
Set Up Virtual Walls: Step‑by‑Step in the App
Having compared Virtual Walls and No-Go Zones, you’ll now walk through placing Virtual Walls in the app so they work reliably with your saved map. Open the map settings, confirm the saved map is current, then choose the virtual walls tool. Draw straight lines on the map to block entry along corridors, doorways, or edges. Lines must connect logically to the map geometry to prevent gaps.
Save the map after placing each line; the app warns if the map is invalidated. If the map changes or resets, virtual walls stop working, and you’ll need to remap and reapply them. Remember, no-go zones differ: they’re polygonal areas and persist through reboots. Use virtual walls when you need precise linear restrictions you can tweak in real time.
Test by starting a cleaning cycle and observing the robot’s behavior. Adjust and re-save until the lines reliably prevent entry without overlapping required paths.
Draw and Manage No‑Go Zones: Step‑by‑Step
No‑Go Zones let you block off areas on your saved map. You can add, move, resize, and save up to 10 zones to keep the robot out of fragile rooms, pet areas, or temporary workspaces. To draw and manage them, enable mapping, open Map Settings, pick No‑Go Zones, draw a rectangle over the target area, and then save.
Real‑time edits let you make temporary adjustments during a run; saved zones persist until you reconfigure them. Note that the map must be current: environmental changes can invalidate the map and disable zones.
- Enable mapping and load the latest map
- Open Map Settings → No‑Go Zones
- Draw, move, resize zone; confirm and save
- Use real‑time edits for temporary needs
- Rebuild map if zones stop working (edge case)
Be mindful of privacy implications when storing maps. Only keep maps on trusted accounts and check app permissions.
When to Use Physical Barriers (Magnetic Strips, Gates)
When your map is changing often or you need guaranteed, fail-safe coverage for hazardous spots, use physical barriers like magnetic strips or gates. They give a tangible boundary that doesn’t rely on sensors or app maps. You’ll choose magnetic strips when you want a low-tech, invisible barrier that blocks RoboVacs reliably; this is especially true for older or budget models that don’t support virtual walls. Place strips carefully with strong double-sided tape, checking alignment so the vacuum detects the barrier. Poor installation can create tripping hazards, so secure edges and keep strips flat.
Use physical gates for reusable, visible control around stairs, pet areas, or fireplaces where map invalidation could let the robot stray. Gates work well when layouts change frequently and you need immediate, human-recognizable boundaries. In short, pick magnetic strips or physical gates when safety and absolute exclusion matter more than the convenience or flexibility of app-based no-go zones.
Troubleshooting: Maps, Sensors, and Common Fixes
Why isn’t your robot mapping correctly or honoring virtual barriers? Check sensors, map validity, and recent changes. Virtual walls and no-go zones depend on stable maps and reliable LiDAR/cameras. Environmental shifts can invalidate virtual boundaries while physical magnetic barriers keep areas blocked.
- Verify sensor cleanliness and alignment: wipe lenses, clear debris, run diagnostics.
- Confirm map integrity in the app: remap after major rearrangements; edit or reapply no-go zones.
- Review virtual wall settings: ensure they’re on the active map and not disabled by a new scan.
Use magnetic barriers or strips for persistent, hardware-level blocking when maps are unstable. Establish regular maintenance routines: firmware updates, battery health checks, and calibration runs.
If problems persist, export/upload logs to support. Perform a factory map reset, then remap from a consistent starting point. These targeted steps reduce mapping errors and restore expected behavior.
Frequently Asked Questions
Do Virtual Walls/No‑Go Zones Affect Spot-Clean or Scheduled Jobs?
Yes, virtual walls and no go zones affect spot-clean and scheduled jobs. You’ll see the robot avoid those areas during any run, including spot-clean and timed schedules.
Set virtual walls for linear barriers and no go zones for rectangular blocks. The mapping enforces boundaries so the device skips or reroutes around forbidden spaces. You’ll still get full cleaning elsewhere; restricted spots stay untouched until you remove or adjust those boundaries.
Can Multiple Virtual Walls Overlap Without конфликтIng?
Yes, you can create overlapping boundaries. However, the robot uses conflict resolution rules to decide behavior. You will see combined exclusion where overlaps occur. The system typically prioritizes the strictest restriction (no-go over soft limits) or the most recently saved boundary.
You should test overlaps in your app since firmware variations change priorities. If unexpected, adjust order or edit boundaries to enforce the intended coverage and avoid ambiguous zones.
Do Virtual Walls Work in Multi‑Floor Maps Automatically?
No, virtual walls don’t automatically apply across floors; you’ll need to set them per floor. For drone navigation using multi-floor mapping, you’ll upload or create separate floor maps and define virtual walls on each level.
The drone navigation system will reference the active map during flight; so ensure consistency and sync between maps. If your platform supports map linking or shared geofencing, use that to streamline settings across floors.
Will Firmware Updates Change My Saved Virtual Walls/No‑Go Zones?
Usually firmware updates won’t wipe your virtual boundaries, but firmware implications can vary by model and update type. You should back up or export maps before major updates because rare failures or map format changes can reset saved virtual walls or no-go zones.
Check release notes for migration notes and follow the manufacturer’s backup instructions. If an update changes map handling, reapply or restore your virtual boundaries after updating to ensure consistent behavior.
Can Virtual Walls Block Mop Mode or Wet‑Mopping Areas?
Yes, virtual walls can block mop mode from entering specific areas. You’ll set virtual walls in the app to prevent the mop module from entering rooms or zones. This ensures the robot avoids wet-mopping where you don’t want moisture.
Make sure the virtual walls are placed precisely and saved; the robot will respect them during mop mode operations. Test once after setup to confirm coverage and adjust as needed.
Conclusion
You now know the difference: use a virtual wall when you need a precise, straight barrier the robot won’t cross, and use no‑go zones for irregular shapes or whole-room exclusion. Set them up in the app, verify the map, and pick physical strips only when sensors fail or you need a backup.
Regularly update maps and check sensors to avoid surprises. Choose the simpler tool that fits the area and task.