Auto-Empty Dock Not Emptying Decision Tree
Start by confirming the dock has power and shows online in the app, and that emptying mode is set to Smart or Max. Lower modes can leave the bin partly full.
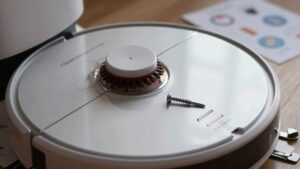
Next, check you’re using the correct S7 dustbin. Reseat the inlet plate and main-brush cover with no gaps, and inspect the robot inlet for hair or lint.
If still no evacuation, flip the dock, remove the cover and bag, clear the duct and filter. Then contact support with model, serial, and test notes for further help.
Quick Overview
- Verify dock power and app status, and set emptying mode to Smart or Max to ensure full suction.
- Confirm correct S7 Auto-Empty dustbin and reseat inlet plate and main-brush cover with no visible gaps.
- Inspect robot dust inlet and airflow path for hair, lint, or warped plastic that prevents a tight seal.
- Flip the dock, remove the cover and filter, and clear internal ducts, seals, or clogs obstructing airflow.
- If the problem persists, collect model/serial, error messages, photos, and test steps. Then, contact Roborock support.
Quick Fixes for Auto‑Empty Dock: Power, App, and Emptying Mode
Wondering why your Auto‑Empty Dock isn’t doing its job? Start by checking power and app settings: make sure the dock’s plugged in and the app shows it online. Set emptying mode to Smart or Max. Lower modes reduce suction and will leave the bin partially full.
Next, confirm physical setup: use the correct new dustbin for Roborock S7 and remove the inlet-cover plate so the dock can pull debris into its chamber. Inspect the dock underside and internal air duct for blockages. Turn it over and clear any lint or obstructions from internal paths.
Reattach the main brush cover on the robot so all four tabs are fully hidden and slots align. This ensures proper sealing during empty cycles. If you’ve followed these maintenance tips and the dock still won’t empty, contact Roborock support to verify dock compatibility with your model and to pursue further troubleshooting.
Check the Auto‑Empty Dustbin, Inlet Plate, and Main‑Brush Cover Fit
Now check the parts that directly control airflow: Confirm you’ve installed the Auto‑Empty dustbin (not the standard bin) for the S7. Remove the inlet plate by the dustbin and reseat it so there are no gaps. Make sure the main‑brush cover is snapped in with all four tabs hidden and aligned with their slots. You’ll perform a quick dustbin inspection and verify auto empty compatibility before testing.
- Remove and confirm: Take out the S7 Auto‑Empty dustbin, verify it’s the correct model for the dock (auto empty compatibility), then reseat firmly.
- Inlet plate: Pull off the inlet plate beside the bin, inspect mating surfaces, then reinsert ensuring no gaps or misalignment that could leak suction.
- Main‑brush cover: Press the cover into place until all four tabs are hidden and aligned with slots. A loose cover can block airflow or misroute debris.
After reassembly, run an empty cycle to confirm unobstructed airflow and effective transfer into the Auto Empty Dock.
Inspect the Robot Dust Inlet and Robot‑Side Airflow Path
Check the robot’s dust inlet and the robot-side airflow path for any debris or misalignment that could block suction into the Auto-Empty Dock. Start by removing the robot from the dock and visually inspecting the dust inlet and surrounding area. Clear hair, lint, and large particles from the inlet and the main brush compartment so nothing redirects airflow away from the suction path.
Look along the robot-side airflow path for trapped debris or warped plastic that can pinch or misalign the seal with the dock. If you spot residue, gently clean with a soft brush or compressed air; don’t force objects deeper into the duct. After clearing visible obstructions, align the robot on the dock and run an evacuation cycle to verify improved suction.
If the problem persists, note any persistent misalignment or damage to report before proceeding to inspect the dock’s internal duct and bag.
Turn Over the Auto‑Empty Dock: Inspect Air Duct, Disposable Bag, and Internal Blockages
If clearing the robot’s inlet and aligning the unit didn’t fix the problem, flip the Auto‑Empty Dock over and inspect its underside. Remove the dock’s cover, pull out the internal filter, and look down the air duct for clogs, trapped debris, or misaligned parts that could block airflow. You’ll perform a focused inspection to find internal blockages and any inspection misalignment that stops evacuation.
Follow these steps:
- Remove and inspect: Take out the internal filter and check the disposable bag housing for debris, tears, or a poorly seated bag that prevents suction.
- Clear the air duct: Use compressed air or a soft brush to remove lint, hair, or compacted dust from the duct and pathways. Verify there’s no obstruction at bends.
- Verify seals and alignment: Confirm the lid seal fully closes, the bag handle seats correctly, and components aren’t warped or misaligned.
Reassemble securely; test evacuation, and repeat inspection if the dock still won’t empty.
When to Contact Support and What Information to Collect
When should you contact Roborock support? Contact them after you complete all prior checks (settings, parts, inlet, internal ducts) and the dock still won’t empty. Don’t waste time on randomized topics or unsupported troubleshooting steps. Escalate when symptoms persist.
Prepare a concise packet of information: robot model, Auto‑Empty Dock model, and serial number. Include proof of purchase and a brief chronology of what you tested and when. Note specific error codes or app messages (for example “No Empty Bin” or a red flashing dock light) and exactly when they occur (after docking, during evacuation, intermittently).
Document each test result (cleared inlet, cleared air duct, reinstalled brush cover) to show progress and remaining issues. Attach screenshots, system logs, and photos of the dock’s internal ducts and bag installation to speed diagnosis. Presenting organized, specific data helps support avoid unnecessary back-and-forth and resolve the issue faster.
Frequently Asked Questions
Why Does the Dock Fail Only After Successful Emptying Cycles?
Because intermittent failures usually stem from gradual issues, you’ll see success initially; then problems later. You’re likely facing design misalignment that tolerates short-term function but shifts with wear or vibration.
You’ll also encounter sensor drift that slowly changes thresholds so emptying stops being detected correctly. You should inspect mechanical alignment, add tolerances or fasteners, and recalibrate or replace sensors to restore consistent emptying cycles.
Can a Full Dustbin Sensor Be Recalibrated Without Parts Replacement?
Yes, you can often recalibrate the dust bin full sensor without replacing parts. Start by powering off the dock. Remove and empty the dust bin. Then clean the sensor area and contacts with compressed air or a soft brush.
Power the dock on and run a manual calibration or reset procedure per the manual. If the sensor still misreads, repeat cleaning. Persistent faults usually mean replacement is needed.
How Do Firmware Updates Affect Docking Alignment Sensors?
Firmware updates can reduce firmware drift and recalibrate sensors, but they can also reveal or worsen optical misalignment if calibration routines change. You’ll see improved timing, compensation algorithms, and diagnostics after updates; these often correct gradual drift.
However, if optical components shifted mechanically, software fixes won’t fully restore alignment. You should run post-update alignment tests, follow manufacturer calibration steps, and report persistent misreads so hardware inspection can be scheduled.
Could Household Humidity Cause Repeated Dock Non-Emptying?
Yes, household humidity can cause repeated dock non-emptying. You’ll see humidity issues when moisture makes dust clump, sticking to sensors or the dustbin and triggering failed empties.
You should dry the bin, inspect seals, and run dustbin recalibration after cleaning. Also, check for residue on the dock’s sensors and ensure good ventilation. If problems persist, reduce indoor humidity and contact support for sensor diagnostics or replacement.
Are Charging Lead Corrosion Kits Safe for User Maintenance?
Yes, charging lead corrosion kits are generally safe for user maintenance when you follow instructions and precautions. Use gloves and eye protection. Work in a ventilated area, and disconnect power before cleaning.
Apply cleaner sparingly, scrub with the recommended brush, neutralize residues, rinse if instructed, and dry thoroughly before reconnecting. If corrosion is severe or you’re unsure, stop and seek professional service to avoid damage or injury.
Conclusion
If your auto-empty dock won’t empty, don’t panic. Start with quick checks: power, app settings, and emptying mode. Make sure the dustbin, inlet plate, and brush cover sit correctly. Inspect the robot’s dust inlet and airflow path.
Tip the dock to check the air duct, disposable bag, and any internal blockages. If issues persist, contact support with your model, firmware, error codes, photos, and a brief description of what you’ve already tried.