How to Replace a Vacuum Belt Step by Step: A 10-Minute DIY Fix
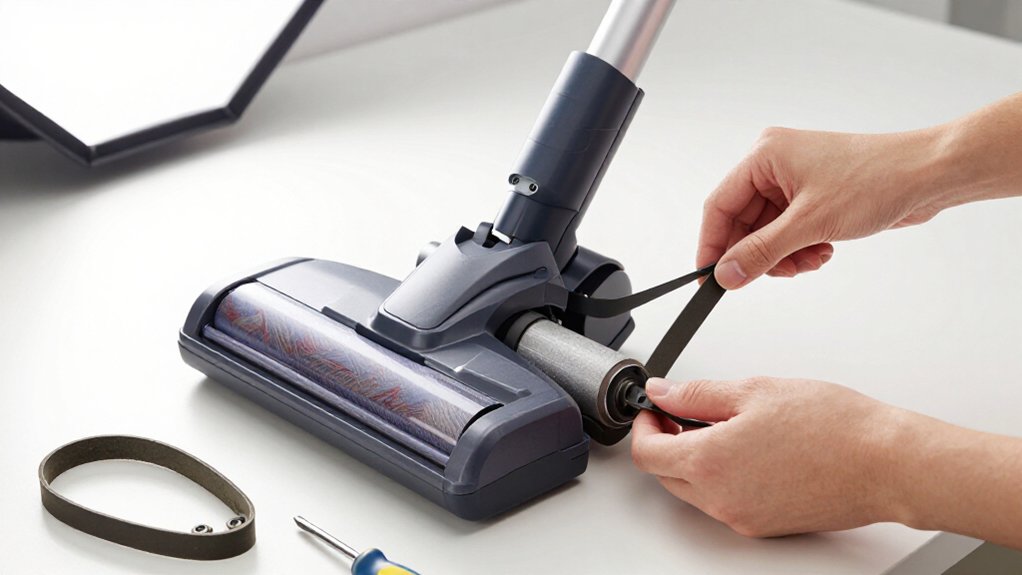
You’ll unplug your vacuum, wait at least 10 seconds, and inspect the cord.
Turn it over on a protected surface, remove the brush cover with a Phillips screwdriver, and group screws together.
Lift out the brushroll, preserving orientation, then remove belt from the pulley and groove.
Clear debris and inspect for damage.
Fit the model-matched belt, rotate brushroll by hand, reassemble, and test for 10–15 seconds.
Stop for odor, noise, or smoke; more help follows.
10-Minute Belt Swap Overview
Before you begin, unplug the vacuum and place it bottom-side up on a protected, well-lit surface. Remove the bottom plate or brush cover with a Phillips screwdriver to expose the brushroll and belt.
Lift out the brushroll, preserving its left/right orientation; you’ll benefit from a photo. Slip the worn belt from the motor pulley and brushroll groove. Clear hair, strings, dust, and snapped belt fragments from the cavity. Inspect the pulley and brushroll ends for damage.
Fit the model-matched replacement belt onto the motor pulley first, then stretch it around the brushroll and seat it fully in the groove between the bristles. Reinstall the cover and screws. Rotate the brushroll by hand; it should engage smoothly. Run it briefly to confirm alignment and no slipping.
Unplug Vacuum Before Beginning
Disconnect the vacuum from its wall outlet, and don’t rely on the power switch alone. A switch can fail or activate accidentally, exposing you to shock or moving components.
- Pull the plug from the wall; don’t yank the cord.
- If it’s cordless, switch it off, remove the battery, and wait 30–60 seconds.
- If it has a detachable power head, disconnect the head and unplug every applicable connection.
- For a hardwired central vacuum, turn off the correct breaker and follow lockout procedures.
Wait at least 10 seconds after disconnection so the motor stops and residual charge dissipates. Inspect the cord for damage before reconnecting.
Keep tools on a nonconductive surface, and don’t proceed until you’ve confirmed the unit remains inert when you operate its power switch.
Step 1: Expose Vacuum Brush Roll
With the vacuum unplugged, lay it upside down on a protected, well-lit surface and locate the screws securing the bottom brush plate. Remove every fastener from the plate, keeping them together and noting positions for reassembly. Lift the plate away carefully; don’t force it if a latch or edge still holds it.
Grip both ends of the floor brush and lift it out of the housing. Slip the worn drive belt off the brush area, then clear hair, string, and belt fragments from the brush roll and cavity. Remove debris before inspection.
If the belt is cut or cracked, check the brush roll ends and surfaces where the belt rides. Look for scoring, buildup, or damage. Keep fingers clear of edges; don’t reconnect power.
Step 2: Gather a Phillips-Head Screwdriver
Grab a Phillips-head screwdriver that matches the brush plate’s screw size; the wrong bit can strip the heads. Unplug the vacuum before you handle any fastener, then flip it bottom-side up on a stable, well-lit surface. Confirm the brush plate is accessible and identify all six screws—or the model-specific number. Use steady downward pressure and turn each screw counterclockwise; keep the driver aligned to prevent cam-out and damage.
Place removed screws in a small cup or on a cloth, grouping them together if lengths differ. Don’t force a screw that resists; verify you’re using the correct Phillips size and check for hidden latches.
During reassembly, align the plate edges, start every screw by hand, and tighten them evenly without overtightening, which can crack plastic.
Step 3: Slip Belt Off Pulley
Unplug the vacuum, turn it bottom-side up, and remove the brush plate to expose the motor pulley and floor brush. Confirm the power cord stays completely disconnected before touching the drive system. Use your screwdriver to remove each soleplate screw and place the fasteners in a container.
Lift the floor brush straight out, keeping fingers clear of sharp edges. Slip the worn belt off the motor pulley first; rotate the pulley by hand only if needed to ease removal. Don’t force a belt that binds.
Wipe dust or grime from the pulley with a dry cloth, and gently work the belt free without scraping its edges. Check the pulley for cracks, deep grooves, or hair and debris. Remove any fragments before installing the replacement.
Step 4: Seat Belt Around Roller
Once the old belt is off, keep the vacuum unplugged and place the new belt in the floor brush’s groove first. Confirm the belt matches your vacuum’s model and uses the specified flat, cogged, or round profile. Seat it fully in the roller groove without forcing or twisting it.
Then stretch the belt toward the motor pulley and fit it over the shaft. Use steady pressure; don’t pry against the brush housing or pinch the belt. Keep your fingers clear of edges, and don’t reconnect power while the brush plate remains removed.
Check that the roller end caps move freely and that debris hasn’t entered the groove. If the belt won’t reach or keeps coming off, stop and verify its correct model belt type.
Step 5: Spin Roller, Check Alignment
How does the roller feel when you turn it by hand? Confirm it rotates smoothly, with light resistance, not grinding, wobbling, or binding. Keep the vacuum unplugged and bottom-side up while inspecting end caps for debris or seized bearings.
Check that the belt sits straight in the motor pulley’s groove; it must stay centered, not twisted or riding over an edge. Pull the roller into its left and right mounts, then rotate it several turns by hand.
The belt should track centrally while the roller spins freely with slight resistance. Inspect the end caps for rotation and no wobble, which could misalign the belt. Before closing, check that no wires or tabs are pinched. After reassembly, run it 10–15 seconds; listen for uneven sound.
Step 6: Replace Four Baseplate Screws
With the vacuum unplugged, lay it on its back and use the correct screwdriver—usually a Phillips—to remove the four baseplate screws. Keep each screw with the others in a small container, or photograph their positions before lifting the plate. This record helps you return every fastener to its original hole.
Lift the baseplate straight up with controlled pressure. Check for retaining tabs that may still be clipped even after all screws are out; don’t force the cover or bend the plastic. If a tab resists, inspect its edge and release it according to the vacuum’s design. During reassembly, align the baseplate precisely, start all four screws by hand, then tighten them evenly until snug. Don’t overtighten, as excessive torque can strip plastic threads inside.
Listen for Quiet Operation
Before reconnecting power, rotate the brush roll by hand to confirm it turns smoothly without scraping the housing.
After you reassemble the vacuum and clear the area, reconnect power and run it for approximately 10–15 seconds. Listen for an even, low sound as the brush roll engages. A properly fitted belt shouldn’t squeal, chatter, or thump. Those noises indicate misalignment or incomplete seating on the motor pulley or brush roll groove.
If you hear rough rotation or stuttering, switch the vacuum off immediately and unplug it. Recheck that the belt remains centered in its groove and secured on the motor shaft. Inspect alignment and end caps before testing again. Stop if grinding occurs; seek service if the brush roll fails to turn smoothly.
Burning Smell After Replacement
A burning smell after replacement means you should switch the vacuum off and unplug it immediately, then let the motor cool. Don’t touch the brushroll or belt area while components remain hot. After cooling, remove the cover and check routing: the belt must sit straight on the motor pulley and centered in the brushroll groove.
| Symptom | Likely cause | Safe action |
|---|---|---|
| Rubber odor | Misrouting | Reseat belt |
| Belt rubbing | Pinched edge | Correct alignment |
| Brushroll resistance | Hair or debris | Clean end caps |
| Belt walking off | Worn pulley | Stop and replace |
Turn brushroll by hand. It should rotate freely; grinding requires cleaning debris and checking end caps. Test for only 10–15 seconds. Stop immediately if odor persists, sound changes, or smoke appears; use only the correct model-matched belt.
Inspect Belt Every 3 Months
Inspect the vacuum belt about every 3 months, or sooner if suction weakens, the motor sounds different, or the brushroll spins inconsistently. Unplug the vacuum, then turn it bottom-side up on a well-lit surface. Never inspect components while power is connected.
Remove the brush plate, typically secured by six screws, and keep the hardware together. Examine the belt for stretching, cracks, glazing, fraying, or slippage from the motor pulley. Check the brushroll area for hair and compacted debris that can increase resistance and accelerate belt wear.
Clean the brushroll and belt cavity before reinstalling the plate. Replace the belt if you find damage, abnormal slack, or tension loss. After reassembly, confirm the brushroll turns freely by hand, then perform a brief powered test.
Conclusion
With the vacuum unplugged, you can finish this 10-minute repair safely and confidently. Confirm the belt sits squarely on the motor pulley and brush roll, then reinstall every baseplate screw. Rotate the brush roll by hand once before reconnecting power.
If you hear unusual noise, smell burning, or notice poor pickup, unplug the vacuum and inspect the belt immediately. Check it every three months, and replace it when you see stretching, cracks, fraying, or glazing.