
Vacuum Storage Tips for Small Apartments: 8 Ideas That Don’t Eat Floor Space
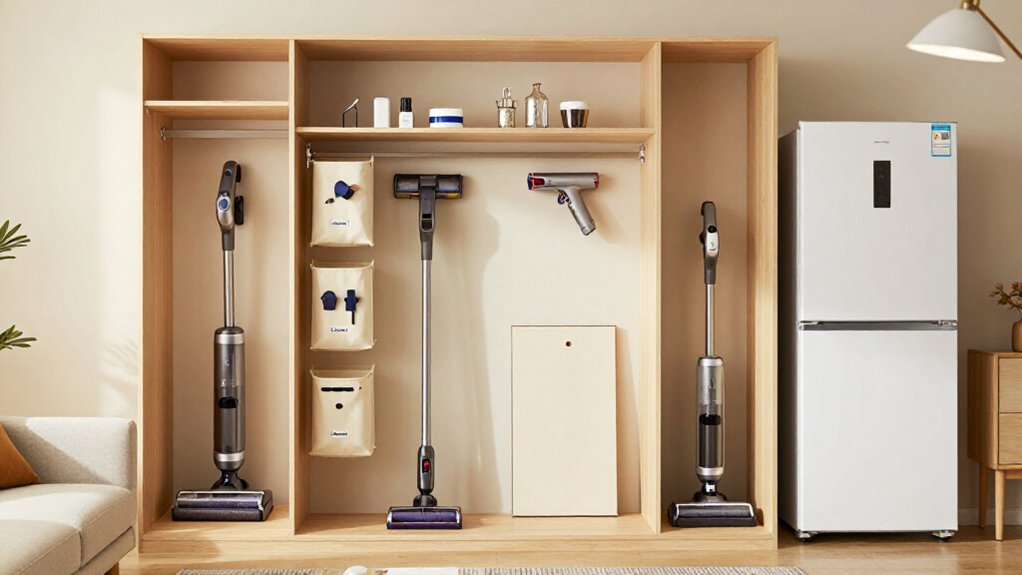
Save floor space by mounting a cordless vacuum on a rated wall dock, behind a door, or beneath a bed; keep canisters upright in a ventilated closet.
Choose a dry spot near an outlet, route cords with clips, and leave charging slack.
Empty bagless bins, dry filters and parts fully, then store attachments in labeled sealed bins.
Don’t wash HEPA filters, and prioritize pet-hair tools.
More smart solutions follow for a cleaner, calmer, clutter-free home.
Walls, Closets, Narrow Gaps
In a small apartment, start by looking up and into overlooked spaces: walls, closet interiors, and narrow gaps. Mount a lightweight vacuum on a manufacturer’s bracket or rated hook to reclaim floor space. Choose anchors for your wall type, and check the load rating for the vacuum and charger. If drilling isn’t allowed, try a tension pole; use adhesive or magnetic mounts only for light accessories.
Inside a closet, reserve a lower section for the vacuum and upper shelves for supplies. Add a pegboard, rail, or labeled bins for hoses, filters, and tools.
For a hidden solution, use an over-the-door rack or a shallow cabinet in a narrow gap. Measure first, protect clearance, and keep exits unobstructed. Clean filters; keep charging gear ventilated.
Cordless vs. Canister Footprints
Choose storage based on your vacuum’s footprint: cordless models usually fit best on a wall-mounted charging dock or beneath a bed, while canisters need a closet or cabinet with room for the body, hose, and wand.
Measure the body diameter, hose length, and available clearance before choosing a spot. Keep cordless models vertical on a rated bracket, behind a door, or in a shallow under-bed bin. Store canisters upright, and separate the hose, wand, and heads in compartments or with hanging hooks to prevent tangles and protect the hose.
| Vacuum type | Best footprint | Storage move |
|---|---|---|
| Cordless | Slim, vertical | Mount or slide under bed |
| Canister | Wider body | Use closet corner |
| Either | Measure first | Match every dimension |
Label attachments nearby so you’ll find each piece quickly.
Charging Access and Cord Control
Choose a spot near a grounded outlet so you won’t run cords across walkways. Create a compact charging station, and secure the cord with adhesive clips.
Hide excess length, but keep the charger accessible and away from heat and pets.
Choose a Spot Near Outlets
Keep your vacuum near a wall outlet so you can recharge it immediately after use without stretching cords across walkways. For a cordless model, choose a spot where its dock can reach the outlet without an extension cord. You’ll keep the vacuum off the floor while maintaining a charging connection.
If you use a corded vacuum, store it close enough to power that the cord won’t snake through clutter or cross a path.
Before settling on the location, measure the vacuum, check plug clearance, and confirm you can open doors or drawers fully. Keep the outlet area away from radiators, heaters, and heat, which can warp plastic or damage electronics. Leave breathing room around the charger, and inspect cords for tangles, fraying, or strain.
Create a Charging Station
A cordless vacuum works best when its wall dock sits near an outlet, ideally by a hallway or entry, so you can return it to the charger without running a cable across a walkway.
Choose a spot with clearance to lift the vacuum on and off easily while keeping the dustbin and cleaning head accessible. Route the charging lead along the wall or through a baseboard channel, so it won’t cross floor. Keep the dock away from radiators and heat sources that could warp plastic or strain electronics.
If you have pets, mount it high enough to keep the vacuum and cable out of reach. Before drilling, check the wall, mounting instructions, and weight rating. Keep the station ventilated while charging, and follow recommended battery-care guidance.
Secure Cords With Clips
Once your charging dock or outlet is in place, use adhesive cord clips to run the cable along the baseboard or inside a closet instead of across a walkway. Leave a small, two- to three-inch slack loop at the dock, then add clips every 12 to 18 inches. This prevents tugging and keeps the plug secure.
If your vacuum hangs behind a door, clip the cable along the frame’s edge so you can reach it without pinching it when the door closes.
For a removable battery, secure only the charging cable while the battery charges. Release it from the storage route when charging ends. Keep the cable away from radiators and pets, which may chew or snag it. Choose clips that match the surface, press them firmly, and let adhesive set before connecting the charger. Inspect the route periodically for loosening or wear, and replace damaged clips before they fail.
Hide Excess Cord Length
Mount the charging dock near a wall outlet so you won’t have to run its cord across a walkway or behind furniture. Measure the route first, then leave only enough slack to reach the dock without tension. Coil the remaining length neatly with a Velcro strap or binder clip, and secure the coil to the dock or mount leg. It won’t dangle, collect underfoot, or snag on nearby furniture.
For a behind-the-door setup, route the cord along the door side rather than across its swing path. That placement reduces rubbing when you open and close the door. Use adhesive cable clips or a slim raceway along the baseboard to hold slack tight against the wall. Keep it away from pets that might chew wiring.
Keep Chargers Easily Accessible
Keep your charging dock near an outlet so your cordless vacuum can dock and charge without cables crossing the floor. Choose a wall-mounted dock in your vacuum route, such as the entryway leading to your living area. You’ll likely return the vacuum after use instead of leaving it out. Use a rated anchor and follow the manufacturer’s mounting instructions.
Give the charger a permanent home right beside the vacuum. Place the charging head and adapter in a drawer, closet pocket, or accessory basket so you won’t search for them mid-clean. If you use a folding charging base, tuck it into a ventilated closet niche or cabinet corner when it’s idle. Keep the charging area clear, and follow charging cycles to help protect the battery.
Prevent Cord Tangling
To prevent charging cords from tangling, choose a wall-mounted docking station beside a power outlet so the cable stays short and off walkways. Route it along the wall with adhesive clips or a cable sleeve, keeping it 10–20 cm above the floor to avoid rugs and furniture legs. Make sure you can reach the charging port without moving the vacuum; repositioning creates twists.
If your vacuum has a retractable or detachable cord, coil it after charging and place it in a bin or drawer divider. Don’t let it hang near the vacuum head. For pet safety, mount the dock above chewing height or store the vacuum in a closet or behind a door. Use rated hardware, and leave ventilation around the charger to prevent overheating.
Keep Filters Away From Moisture
Choose a cool, dry storage spot away from bathrooms, laundry areas, and wet floors. Let each filter dry completely, ideally for 24 hours, before storing it. Once dry, place it in a sealed container; if moisture remains, use a breathable paper bag instead.
Choose Dry Storage Areas
A dry closet, cabinet, or interior corner protects your vacuum’s motor, electronics, and battery contacts from moisture. Use a tall shelf or slim cabinet to keep the machine off the floor without sacrificing walking space.
Before storing it after wet pickup or humid cleaning conditions, let the hose, wand, dust cup, and filter dry completely.
Place fully dry filters and dust cups in a sealed container labeled for quick access. Don’t seal any part while it’s damp; trapped moisture can create odors, mold, and weaker suction.
For a wall dock, choose a spot away from steam, sinks, and mopping paths, and allow airflow around the charger. Check your vacuum’s dimensions before committing to under-bed storage, and always keep the compartment clean, dry, and uncluttered.
Avoid Damp Rooms
Even a dry storage spot won’t protect your vacuum if it’s near a sink, shower, laundry area, or leak. Choose a ventilated closet, interior cabinet, or tall hallway unit instead of a bathroom or laundry corner. Keep the charging dock away from water sources and damp walls, since moisture can corrode contacts and harm electronics, motors, and battery connections.
Before storing a bagless model, empty its canister and check for moisture trapped around seals or hoses. Don’t tuck the vacuum into a poorly ventilated corner, under a leaking pipe, or inside a tightly packed cabinet.
Use a small labeled bin nearby for filters and accessories, but keep it off wet floors. A dry, airy vertical spot protects components without consuming valuable floor space overall.
Let Filters Dry Completely
After you rinse a vacuum filter, let it air-dry completely at room temperature for 24–48 hours before reinstalling it. This prevents mold, odors, and suction loss. Set it on a surface with good airflow, and turn it occasionally so both sides dry evenly. Don’t rush the process: a damp filter can make your vacuum work harder and spread smells.
Keep the filter away from bathrooms, laundry areas, windows with condensation, and damp under-stair spaces. Avoid heaters and radiators, too; intense heat can warp plastic parts and damage foam or pleated media. If you use a wall mount or cabinet, wait until the filter feels completely dry before putting it back. Choose a dry spot with enough air circulation, and check it before reinstallation.
Use Sealed Storage Containers
To keep filters and brush heads clean in a humid apartment, store them in a lidded bin or sealed bag once they’re completely dry. Place washable filters and foam pre-filters inside a separate sealed bag or small bin, then keep it in the container.
This extra barrier protects clean, ready-to-use parts from dust, debris, and closet humidity. Never seal a damp filter; trapped moisture can cause mold and unpleasant odors.
Choose a container that fits a shelf, closet niche, or under-bed spot, and keep it away from bathrooms, vents, radiators, and windows. Label the lid with filter type and cleaning date, such as “HEPA filter, last cleaned 2026-09.” You won’t need to reopen the container, so parts stay protected while your floor space stays clear.
Plan for Attachment Storage
When you choose a storage spot for your vacuum, reserve a nearby place for its crevice tool, dusting brush, and upholstery head. Use a small wall rack, closet door holder, or hanging organizer with separate sections. Each attachment gets its own slot, so you can grab it quickly without digging through a crowded pile of hoses and tools.
If your vacuum has a docking station, place the organizer beside it on the same wall, ideally near an outlet. This keeps accessories visible and your setup compact. Choose a dry location away from radiators, which can warp plastic parts.
For wet-dry attachments, keep them dry between uses. Label sections if you store filters or extra pieces nearby. This system prevents lost tools and tangled hoses.
Measure Bin-Emptying Clearance
Keeping attachments organized is only half the setup; you’ll also need room to empty the bin without moving the vacuum. Measure the vacuum’s height, width, and depth, then trace the bin’s travel path. Check door swings, baseboards, and furniture. For wall mounts or behind-door storage, preserve at least 8–12 inches (20–30 cm) in front of the bin door so you can pull the dust cup, reach, and close it without tipping the vacuum.
Under a bed, confirm the dust cup can slide forward or sideways without scraping. In a narrow gap, dry-fit the vacuum and empty the bin before installing anything; stiff latches and tangled accessories may need wiggle room. Mark the pull distance with painter’s tape, then test the setup with floor occupied.
HEPA Filters Aren’t Washable
Most HEPA filters aren’t washable because water can damage their fine filter media and reduce filtration. Keep the filter dry, and don’t tuck a damp one into a drawer or sealed bin, where odors or mold can develop. Check your vacuum’s manual before cleaning: some filters allow only gentle surface suction, while aggressive washing can clog pores and permanently harm the structure.
Plan replacement storage by keeping a labeled spare in a small ventilated container near the vacuum. Many filters need replacement every six to twelve months, depending on use and dust load. If the filter gets wet, let it dry fully before reuse, but replace it if the manual advises. Never assume “washable” unless the manufacturer explicitly labels it. Store it upright, separately.
Prioritize Pet-Hair Pickup
Prioritize quick access if pets shed heavily: mount a cordless vacuum near an outlet or place a corded model in a nearby closet, and keep its motorized pet brush and crevice tool in the same caddy. You’ll grab everything for spot-cleaning instead of searching through drawers. Choose a wall dock or closet shelf near entryways and rooms. For cordless models, keep charging areas ventilated and away from radiators. Store corded vacuums behind a closed door or on a high shelf if your pet chews cables.
- Mount the vacuum vertically to preserve floor space.
- Label a nearby bin for filters and tools.
- Check the brush after each run and remove wrapped hair.
A consistent grab-and-go setup helps you handle shedding before fur spreads across your apartment.
Conclusion
When you plan vacuum storage, think vertically first. Mount a cordless unit on a wall, use closet doors, or claim a narrow gap, but leave room for charging, bin removal, and airflow. Keep filters dry, store attachments together, and measure clearance before choosing a shelf or cabinet.
For pet hair, prioritize the vacuum’s brush performance over bulky extras. A few smart measurements keep your floor clear and cleaning convenient every day in small spaces, too.
