Robot Vacuum Maintenance Schedule: A Weekly-to-Yearly Care Routine
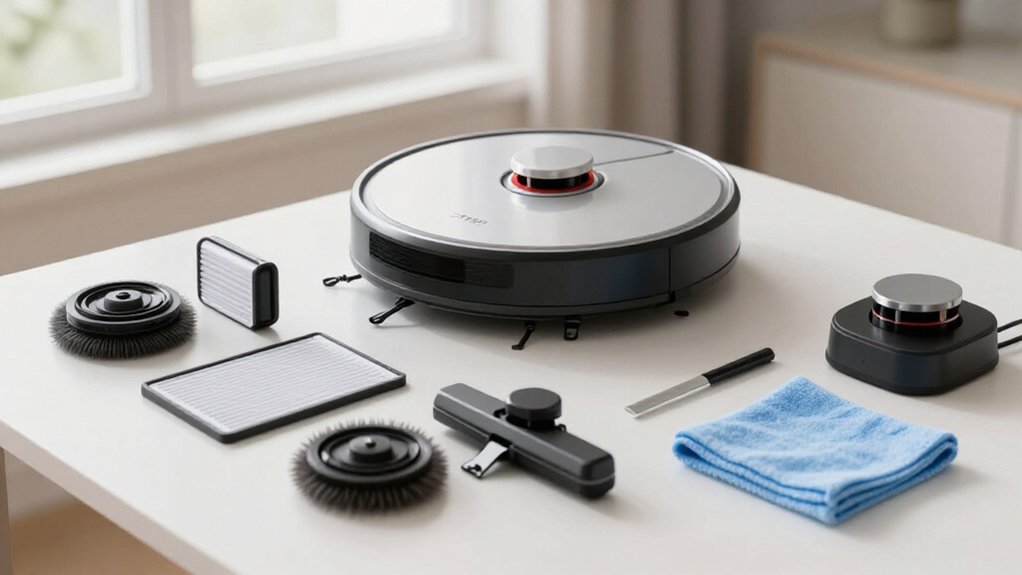
You’ll keep your robot vacuum reliable with a schedule.
After every run, power it down and check the roller, axles, and dustbin; remove debris.
Empty the bin daily during shedding or every two to three days with heavy loads.
Clean brushes weekly, twice weekly in spring and fall, and replace or wash filters as directed.
Weekly, wipe sensors, contacts, and dock areas dry.
Check the transfer port monthly and replace parts yearly.
More practical guidance follows below.
Routine for Shedding-Pet Homes
If you have a shedding pet, do a quick 30-second inspection after every run, before the robot docks. Look for hair wrapped around the main roller and caught in wheel axles. Power the robot down before removing the roller or reaching parts. Cut strands along the roller with scissors or a seam ripper, then clear. This prevents drag, motor strain, and stalled cleaning.
After each session, empty the dustbin, especially during heavy shedding. At the first sign of buildup, check it daily for a week and note how it fills. Schedule a full roller and wheel inspection twice weekly in spring and fall. Check the self-emptying dock monthly for a full bag or clogged transfer port, because either can stop debris transfer without an obvious warning before the next cleaning cycle begins.
Soft Brush, Microfiber Cloth
After clearing pet hair from the roller and wheels, use a soft-bristle brush and a lint-free microfiber cloth to remove the fine dust that collects around sensors, vents, filter edges, charging contacts, and crevices.
Work methodically:
- Power down the vacuum, then brush loose dust from sensor borders, filter housing lips, vents, and accessible bearings.
- Wipe sensor windows, camera or LiDAR covers, and bumper surfaces with a dry, lint-free cloth using gentle strokes.
- Clean charging contacts with a dry cloth, or one lightly treated with 70% isopropyl alcohol if your manual allows it; let everything dry completely.
- Repeat weekly, or immediately after navigation errors, docking failures, or visible dust buildup.
Keep the cloth slightly damp only for approved exterior surfaces; never saturate electronics. Don’t use metal tools, rough pads, ammonia, or bleach.
If you wash a filter, air-dry it for at least 24 hours before reinstalling. Check your model’s manual before using alcohol or cleaning any coated optical surface.
Weekly Dock Dustbin Emptying
Once a week, check the self-emptying dock’s bag or canister and empty or replace it before it becomes full, since a blocked bag can stop debris transfer without an obvious warning. Glance at the robot’s dustbin contents to confirm the dock transfers debris. During shedding season, check sooner and adjust your verification frequency if the bin fills quickly.
| Check | Action |
|---|---|
| Bag or canister | Empty or replace before full |
| Debris port | Inspect monthly for buildup |
| Charging contacts | Wipe both sides with a dry microfiber cloth |
| Pet-heavy homes | Verify the bag more often |
If charging or docking seems weak, wipe contacts with a dry microfiber cloth; dampen it with 70% isopropyl alcohol when needed, but don’t soak the dock. Follow the model’s bag instructions for replacement.
Clean Sensor Windows Last
Clean the sensor windows last, after you’ve emptied the bin and cleared the brushes, so loosened dust doesn’t settle back onto them. Use a soft, dry microfiber cloth to remove dust and debris, and don’t apply water or cleaners that could cause moisture damage.
Afterward, test navigation, cliff detection, and docking to confirm the sensors work properly.
Why Sensors Come Last
Sensors come last because brushes, wheels, and filters usually cause performance problems before dusty sensor windows do.
You begin with the roller, side brushes, wheel wells, and filters, because hair and buildup there can reduce pickup and strain movement sooner. Once those parts look clean, assess navigation, docking, and bumper behavior. If the robot cleans poorly, sensor windows become the next step.
Fine dust can form a film that interferes with cliff sensing, cameras, or obstacle detection. Use a dry microfiber cloth and wipe each window gently; don’t apply liquid unless your manual permits it. Schedule this check weekly or more often in dusty homes. Cleaning sensors last keeps your routine efficient and helps you fix navigation issues without overlooking components that usually cause performance loss.
Clear Dust And Debris
Start by emptying the dustbin and removing hair from the main roller and wheels so loose debris doesn’t continue shedding onto the robot’s sensor area. Next, inspect the side brush and caster wheels for threads, hair, or packed dirt. Remove debris from bearings and wheel housings, then confirm each wheel spins freely. Check the filter and empty or tap it as your model directs to preserve airflow.
Keep cords and clutter out of the cleaning path so the robot won’t stop repeatedly and shake more dust near its sensors. Once the roller, wheels, dustbin, and filter are clear, clean sensor windows last. This order keeps loose particles from settling over cliff sensors or camera windows, which can disrupt navigation and docking. Make this 30-second check after every run.
Use A Soft Cloth
Once the brushes, wheels, dustbin, and filter are clear, wipe the sensor windows and front bumper last with a clean, dry microfiber cloth.
Work methodically around the robot’s surface so you don’t transfer grit from recently cleaned parts onto sensitive areas. Fold the cloth to expose a fresh section and use light pressure across each sensor window. Avoid soaps, solvents, and abrasive materials because they can leave residue or scratch the viewing surface.
Pay attention to the cliff sensors, camera window if equipped, and docking-related windows. Dust films can interfere with cliff detection, camera behavior, docking, and navigation. Inspect each window under good light when you’re finished. If you see streaks or remaining dust, use another clean, dry section of the cloth.
Avoid Moisture Damage
Protect the robot’s sensor windows from moisture by cleaning them last, after you’ve removed dust and debris from the brushes, wheels, and dustbin. Use a dry microfiber cloth first, wiping gently so you don’t push grime into openings. If residue remains, barely dampen the cloth; never soak it or let moisture collect around the sensors.
After wiping, leave the robot dry before running it again; remaining moisture can affect cliff and camera-like sensor performance.
Keep mop pads separate and air-dry them completely before reinstalling them. Moisture can encourage mildew and spread dirty residue to nearby components. If you use isopropyl alcohol on charging contacts, wait until it evaporates before docking. This keeps residual liquid away from sensitive sensor areas and helps prevent moisture damage.
After you’ve finished the other maintenance tasks, clean the front bumper and sensor or camera windows last with a dry microfiber cloth. This removes dust film disturbed while you cleaned brushes or wheels. Keep every surface dry, and inspect the windows under good light for streaks or remaining particles.
Start a short test run and watch the robot follow its usual routes. Check for repeated stops, collisions, or “lost” behavior, then compare its mapping with the previous run if your model supports that feature. Confirm that it reaches the charging base and docks smoothly; dirty windows can disrupt alignment.
If problems persist, repeat the test, recheck every sensor area, and make sure it’s completely clean and dry before running a full cleaning session.
Carpet-Heavy Homes
In a carpet-heavy home, clean the main roller and side brushes weekly, increasing to twice weekly during spring and fall shedding. Empty the dustbin at least weekly, or daily during heavy shedding, to prevent clogged airflow.
Replace or wash the filter monthly as directed, but never wash non-washable HEPA media.
Clean Brushes Frequently
For carpet-heavy homes, clean the robot vacuum’s main roller and side brushes weekly to prevent pet hair and carpet fibers from reducing pickup or straining the motor. First, power off the robot and remove the main roller according to your manual. Cut wrapped hair lengthwise with scissors or a seam ripper, then pull it away without bending the bristles.
Clean both ends and inspect the axle for trapped threads or hair; buildup there can cause dragging and weaker carpet cleaning. Refit the roller only after it spins freely.
Next, remove side brushes and pull hair and debris from each mounting pin. Wipe hubs, check bristles for damage, and reinstall securely. If shedding increases in spring or fall, check brushes twice weekly to prevent buildup.
Empty Bins More Often
Carpet-heavy homes usually fill a robot vacuum’s dustbin faster because carpet fibers trap dirt and pet hair, so empty it every 2–3 days if you don’t use a self-emptying dock. If you have pets or heavy shedding, empty it daily; a packed bin can reduce suction. After each run, spend 30 seconds checking the bin, roller, and wheels. Remove tightly wrapped hair so it doesn’t slow the robot.
With a self-emptying dock, inspect the bag periodically. A full bag can stop transfer silently, leaving debris behind. During spring and fall shedding, check the bin daily for one week. If it fills quickly, keep daily emptying and schedule routine twice weekly. Record your results and adjust the interval to match your carpeted rooms’ debris load.
Replace Filters Regularly
Checking the dustbin isn’t enough when carpet fibers and fine dust are filling the filter faster. In carpet-heavy homes, inspect the filter weekly and clean it as recommended. If it’s washable, rinse it every one to three months, or sooner when suction drops, then let it dry completely before reinstalling. Never wash a non-washable HEPA filter; use only an approved dry method.
Replace disposable filters every two to six months, or when your app signals service. Don’t wait for weak pickup: a clogged filter can restrict airflow even when the brushes and sensors look clean. Record each service date on your calendar.
Compare filter wear during carpet season or heavy-traffic periods, then shorten the interval when needed. Keep a spare filter so you can restore filtration.
Fewer Mid-Run Pauses
Clear the floor before scheduling a cleaning run: remove cords, toys, and liquid messes, and keep pathways open so the robot can complete coverage without stopping.
After every run, you need only a 30-second visual check of the roller and wheels before docking. Remove hair or threads so tangles don’t force a pause.
Wipe the sensors and front bumper weekly with a dry microfiber cloth to prevent navigation hiccups, rerouting, and repeated stops.
Check the dustbin after each run; in pet-heavy homes, empty it daily during shedding season or whenever it’s filling quickly. A full bin can weaken suction and interrupt cleaning.
Use the app to schedule shorter, targeted runs when needed and create no-go zones around problem areas for smoother, full coverage.
Watch for Burning Smells
A burning smell usually signals overheating caused by hair or debris jammed around the main roller, wheel axles, or brush motor. If you notice it after a run, stop the robot immediately and unplug the dock before inspecting it. Check the roller, brush housing, and wheel axles for wrapped hair, caked grit, or anything restricting movement.
Cut away tangled hair carefully, then wipe the wheels and surrounding parts clean. Restart only after every component moves freely and shows no damage. If the odor returns, appears with frequent error codes, or continues after cleaning, stop troubleshooting and contact customer support.
Also inspect charging contacts on the robot and dock if you notice docking or charging problems; dirty contacts can destabilize charging cycles too over time.
Skipping Filter Replacement
When you postpone filter replacement, trapped dust and hair restrict airflow, weaken suction, and force the motor to work harder. Your robot may leave debris behind and recirculate allergens. Follow this method:
- Check your model’s schedule and identify whether the filter is washable or disposable.
- For a washable filter, rinse it every one to three months, let it dry completely, and reinstall it only when dry.
- Replace disposable filters every two to six months; don’t wash non-washable HEPA filters, because water can permanently reduce fine-particle capture.
- If suction stays weak, inspect the filter and check your self-emptying dock’s bag and transfer path; dock problems can exist separately.
Keep spare filters for busy homes, so you can replace one promptly.
Inspect Charging Contacts Monthly
Monthly, inspect and wipe the robot’s and dock’s charging contacts with a dry microfiber cloth to remove dust and residue. Unplug the dock first, then turn the robot over and check each metal contact for film, discoloration, or stuck debris. Clean the surrounding area and the self-emptying dock’s debris port as well; buildup there can cause silent transfer problems.
If grime remains, dampen the cloth lightly with isopropyl alcohol, never soak the contacts, and allow every surface to evaporate completely. Dock the vacuum only after the contacts feel dry. Run a charging test and confirm that the indicator or app shows normal charging. If charging seems inconsistent, clean contacts first; don’t assume battery decline, because dirt can mimic it, so set a monthly reminder.
Conclusion
Keep your robot vacuum reliable by matching its care to your home’s demands. Empty the dock weekly, especially with shedding pets, and use a soft brush and microfiber cloth for buildup. Clean sensor windows last, inspect charging contacts monthly, and replace filters on schedule.
If you’ve got heavy carpeting, watch for fewer mid-run pauses and burning smells. Don’t ignore either warning: stop the vacuum, inspect it, and arrange service before small problems become costly repairs.