How to Replace Robot Vacuum Side Brushes
You’ll start by powering off the robot and clearing a clean, well-lit workspace with a Phillips screwdriver and the replacement brush.
Flip the robot, remove the bottom cover, and loosen the two module screws to lift the side-brush assembly out as one piece.
Unscrew the brush center screw, pull off the old brush, seat the new brush, and hand-start then tighten screws without overtightening.
Refit the cover, power up, run a short test, and continue for tips on troubleshooting.
Quick Overview
- Power off the robot and remove it from the charger before starting to avoid damage or accidental activation.
- Clean the side brush area and clear debris so mounting screws and contacts are visible and accessible.
- Remove the bottom cover, loosen the two module screws, and lift out the side-brush module as one piece.
- Pull off the old side brush, align the replacement module, start screws by hand, and tighten without overtightening.
- Reattach the bottom cover and side brush. Then power up and run a short test to verify normal operation.
Quick Steps: Replace a Robot Vacuum Side Brush in 5 Minutes
Want to swap a worn side brush in about five minutes? Start by removing the bottom cover to access the side brush module area. Locate and remove the two screws that retain the module; then lift the whole module out. Set the module aside. Don’t get distracted by any irrelevant topic or aside discussion you overhear.
With the module out, loosen the side brush screw with a screwdriver and pull the existing side brush off its mounting. Fit the replacement side brush module into the mounting location, align it, and tighten the two module screws to secure it.
Reattach the bottom cover, checking that it sits flush. Then, reinsert and tighten the side brush screw to hold the brush firmly. Finally, secure all four bottom cover screws. Work methodically, keep screws organized, and you’ll complete the swap quickly without needing the next section’s prep steps.
Prepare Workspace and Tools for Side-Brush Replacement
Before you start swapping the side brush, set up a clean, well-lit workspace and gather a small Phillips screwdriver and the replacement brush that matches your model. Power off the robot and unplug or remove its charging dock so it can’t activate while you work. Clear nearby debris and wipe the area around the side brush base to prevent interference when you begin disassembly.
Lay out a small tray or magnetic mat and place screws and parts in the order you remove them; this reduces reassembly errors. Inspect the replacement brush and mounting area for defects or wear; confirm compatibility and fit before proceeding.
Consider tool ergonomics: choose a comfortable Phillips screwdriver that gives you control in tight spaces to avoid stripping screws. If you like, jot brief topic ideas for troubleshooting or parts to check later (e.g., worn gears, loose pins) so you remember what to review after replacement.
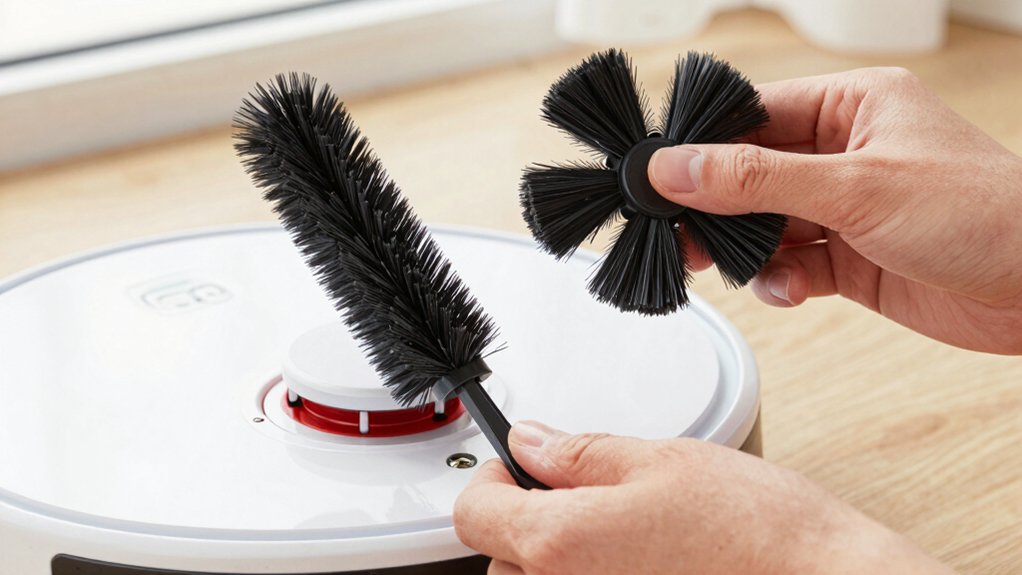
Remove Bottom Cover and Old Side Brush
Ready to access the side brush, loosen the screws holding the bottom cover and remove it so you can reach the brush assembly. You’ll work methodically: first expose the area, then free the side brush from its mount.
Use a screwdriver to loosen screws at the cover and the brush spindle. Then, pull the side brush straight off. Set the old brush aside and inspect the mount.
- Loosen screws on the bottom cover to remove the bottom cover safely.
- Use a screwdriver to loosen the side brush screw and pull the brush away.
- Identify the two screws that retain the side brush module before proceeding.
- Remove mounting screws if you’ll detach the module later; note screw locations.
- Inspect the mounting area for debris and ensure clear access to reinstall the brush.
Keep screws organized and note their positions. After you remove the bottom cover and old side brush, you’ll have a clear, clean mounting area ready for the replacement module.
Detach and Install the Replacement Side-Brush Module
With the bottom cover and old brush removed, loosen the two screws that hold the side-brush module to the robot. Lift the module out as a single piece. You’ll remove the entire module and set the old unit aside. Inspect the mounting area for debris, broken clips, or misaligned connectors so the replacement will seat properly.
| Step | Checkpoint | Action |
|---|---|---|
| 1 | Screws loose | Back out two retaining screws |
| 2 | Module free | Lift module straight up |
| 3 | Mount area | Clear and inspect |
Align the replacement side-brush module with the mounting slots. Lower it straight into place and start both screws by hand to avoid cross-threading. Tighten the two retaining screws securely; however, do not overtighten. Verify the module is firmly attached and that related components are accessible.
If you routinely replace battery packs or consider renewable energy for charging, keep connectors clean while installing. Once secure, you’re ready to continue with reassembly.
Reassemble, Tighten Screws, and Troubleshoot Common Issues
How do you put everything back and make sure it stays put? Start by seating the replacement side-brush module, then tighten the two module-retaining screws so the module sits firm. Reattach the bottom cover, align it, and fasten the four cover screws to restore enclosure integrity.
Reassemble the side brush, place it in position, and tighten its dedicated screw.
Perform reassembly checks: confirm screws are flush and gaps are even. Check screw torque gently; don’t over-tighten plastic threads. If the brush feels loose, recheck the two module screws and the brush screw. Inspect for rubbing or misalignment before powering the vacuum.
Finish with a final reassembly checks pass: wiggle the brush and module to confirm no play. If you still detect looseness, sequentially loosen and retighten screws to realign parts. Then apply correct screw torque again. Power up and run a short test to verify normal operation.
Frequently Asked Questions
Can I Use Aftermarket Side Brushes Instead of OEM Parts?
Yes, you can use aftermarket side brushes, but check aftermarket compatibility first. Inspect fit, shaft size, and rotation direction. Swap one brush and test performance.
Keep receipts and note installation date because using non-OEM parts can have warranty implications. Manufacturers may deny claims for related damage. If warranty matters, contact the maker for approved replacements or buy OEM.
Replace brushes regularly for optimal cleaning and motor protection.
How Often Should I Replace Side Brushes Under Heavy Use?
Under heavy use, you should replace side brushes every 1–2 months. Check weekly for fraying, bending, or missing bristles. Heavy use impact accelerates wear and can reduce suction and edge cleaning.
Remove and inspect brushes; clean debris and hair. Then test performance. If cleaning doesn’t restore shape or efficiency, install replacements. Keep spares on hand and note replacement frequency to maintain consistent cleaning results and avoid motor strain.
Are Side Brushes Compatible Across Different Robot Models?
Some side brushes are compatible across models, but many aren’t. Check compatibility questions on the manufacturer site or manual first. Compare mount type, diameter, and pin shape; if they match, you can swap them.
Aftermarket options exist and often fit multiple models; yet verify specs and read reviews to avoid poor fit or wear. When installing, align the pin, press firmly, and test rotation before regular use.
Can I Clean and Reuse Heavily Worn Side Brushes?
You can sometimes clean and reuse worn brushes, but don’t expect full performance recovery. First, remove debris, hair, and gunk with tweezers and mild detergent; rinse and air-dry completely. Inspect bristles and hub for fraying or imbalance.
If damage persists, replace with OEM or verified aftermarket parts. Check aftermarket compatibility for fit and motor mount. Keep spares and replace regularly to maintain suction and edge-cleaning efficiency.
Do Side Brushes Affect Warranty Coverage if Replaced?
Yes, replacing side brushes can affect warranty coverage if you use non-approved parts or damage the vacuum during installation.
You should check your warranty terms, use manufacturer-approved replacement brushes, and follow installation instructions. Keep proof of purchase and document the replacement.
If you stay within the guidelines and don’t alter warranty seals or internal components, warranty coverage usually stays valid. Otherwise, manufacturer service may be denied.
Conclusion
You’ve now swapped the worn side brush for a new one and reassembled the vacuum. This is easy, quick maintenance that keeps edge cleaning effective.
Test the robot on a short run to confirm the brush spins freely and the vacuum moves without unusual noise or vibration. If you see issues, recheck brush seating, screws, and the motor coupling.
Do this every few months or sooner if performance drops to keep your robot cleaning at peak efficiency.