Tile Floor Cleaning Routines With Robot Mops
You can keep tile floors consistently clean with a robot mop by prepping, configuring, and finishing each run. Sweep or vacuum to remove grit. Spot-treat stains, then attach a damp mop pad or fill the spray tank with a pH-neutral cleaner. Set tile mode; adjust water flow and suction for grout and tile size, and run overlapping passes from the far corner toward the exit.
Afterward, ventilate to speed drying. Keep going to learn setting tweaks and stain fixes.
Quick Overview
- Sweep or vacuum first to remove grit and prevent scratches before running the robot mop.
- Attach a damp, tile-safe mop pad and use a pH-neutral cleaner to avoid grout or tile damage.
- Select a tile-optimized mode and adjust water flow and suction for tile size and grout sensitivity.
- Use overlapping passes. Start from the farthest corner and enable edge/grout focus for thorough coverage.
- Spot-treat stains and grout manually. Then re-run targeted robot passes or enable AI stain detection.
Quick Start Checklist: Robot Mopping Tile Floors
Looking to get your tile floors spotless fast? Start by sweeping or vacuuming to remove dust and debris so the robot mop can focus on grime, not grit. Set the robot to a tile-optimized mode: select “tiles” or adjust suction and water levels so it applies the right amount of moisture.
Check that the mop pad is firmly attached and only damp; a soaking pad leaves streaks and slows drying. Choose a pH-neutral cleaner; skip acidic, ammonia, bleach, or wax-based products that can harm grout and tile. After the run, ventilate the room or enable any drying-help settings your robot offers to speed evaporation and prevent residue.
Ignore irrelevant considerations and unrelated topics like pet grooming or carpet shampoos while prepping. Follow this quick checklist every time: sweep, set tile mode, attach damp pad, use neutral cleaner, and dry thoroughly—simple, repeatable steps that protect surfaces and deliver consistent results.
Choose the Right Robot Mop: Spray vs. Pad, Water Control & Suction
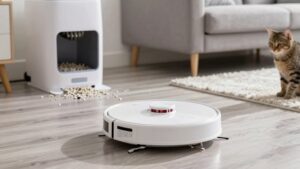
Which system fits your floors and habits best? You’ll weigh spray versus pad, water control, and suction to match tile conditions and your routine. Spray models like the Brav Jet M6 deliver active water spray during the cycle, keeping ongoing wetness that dilutes stains. This feature pairs well with stronger suction to lift debris.
Pad systems such as the Bravo 380t use a pre-wetted pad; effectiveness depends on pad condition and saturation. Worn or dry pads cut cleaning power and may need longer runs.
If you want faster cycles and consistent wetting, pick spray-assisted units. They often finish tasks sooner and handle stubborn spots with less manual prep. If you prefer simplicity and lower water use, pad systems work when you maintain fresh pads and accept slower results.
Also consider extras: additional scent profiles in cleaning solutions and smart battery optimization for longer jobs. Match choice to your tile grout, stain types, and how much maintenance you’ll commit to.
Prepare Your Tiles: Sweep, Spot‑Treat, and Protect Grout
After you pick the right robot mop, get the floor ready so the machine can do its best work: Start by sweeping or vacuuming to remove loose grit and debris that’ll abrade tiles and clog mops. Then spot-treat stains before running a full cycle. Sweep thoroughly around baseboards, under chairs, and near a toy dog’s play area so crumbs and hair don’t get pushed into grout.
Use a pH‑neutral cleaner and a damp mop for spots, testing in an inconspicuous tile first to avoid etching grout. For stubborn spills, make a paste of hydrogen peroxide and baking soda, apply to grout lines, and then gently scrub or steam clean ceramic or porcelain tiles. Don’t saturate grout; excess water lengthens drying time and invites damage.
After cleaning, dry the surface promptly with a microfiber pad or fan; position a ceiling fan or open windows to speed drying. Prevent future grit by using entry mats and soft furniture pads to protect grout between robot mop sessions.
Configure App Settings: Water Flow, Suction & Cleaning Modes
Want the robot to treat your glazed ceramic or porcelain tiles like a pro? Use the ECOVACS HOME app compatibility to dial in water flow, suction and cleaning modes so each pass fits the surface. Set suction power higher for loose debris before mopping. Then, switch to a tile mop mode with moderate suction to avoid streaks. Choose standard for routine maintenance, deep clean for ground-in grime, and heavy-duty when stubborn stains need extra water and agitation; each mode maps to predefined water flow levels you can tweak.
Use water flow control to increase dampness on large glazed tiles and lower it around delicate grout lines to prevent over-wetting. Enable AI Stain Detection so the robot temporarily boosts flow and intensity on greasy spots.
Finally, schedule tile-specific runs for low-traffic, low-moisture windows. Check pricing options for advanced app features that unlock premium modes if you need finer control.
Step‑By‑Step Robot Mopping Routine for Best Results
Ready to get the cleanest possible tile floor with your robot mop? Start by removing loose debris: sweep or vacuum so grit won’t be ground into grout. Test your chosen cleaner on a small tile area. Then set a damp mop mode with controlled water flow to avoid over-wetting.
Program the robot to begin at the farthest corner and work toward the exit. Use overlapping passes to ensure full coverage and a streak-free finish. Enable edge and grout focus so the mop pays attention to transitions and grout lines for grout protection.
If your model has AI stain detection, turn it on; otherwise, plan a targeted pass with higher suction and slightly adjusted water flow for isolated trouble spots. After the run, open windows or vents and use rapid-dry or high-dry robot settings if available to speed drying. Inspect joints and repeat short targeted passes only where needed to maintain results.
Stubborn Stains, Grout, and Troubleshooting (When to Clean Manually)
How do you tackle stubborn stains and grout that your robot mop can’t fully handle? Start with targeted treatments: for set-in spills or dye, apply a hydrogen peroxide and baking soda paste to grout lines, let it sit, then scrub gently. If the robot’s pad or spray fails on crayon or dye, pause and do spot manual cleaning. Re-wet the pad and resume robot cleaning for a uniform look.
When grout or textured, unglazed tiles resist cleaning, switch to manual cleaning with a soft-bristle brush and a pH-neutral cleaner to avoid damaging grout. For heavily soiled grout on ceramic or porcelain, consider steam cleaning. Steam mops often outperform standard mopping in grout lines.
Troubleshooting tips: if spills persist after multiple robot passes, wipe the area manually with a microfiber cloth and appropriate cleaner. Then run a quick robot cycle to finish. Regular inspection and timely manual intervention keep tile and grout looking their best.
Frequently Asked Questions
How Often Should I Replace Robot Mop Pads for Optimal Cleaning?
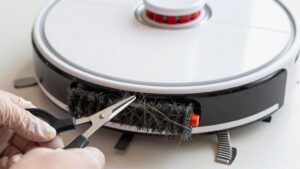
Replace robot mop pads every 3–6 months for typical use. Replace them sooner if you see wear, reduced performance, or odors. Check pad lifespan from the manufacturer and factor mop pad materials: microfiber lasts longer than foam blends. You’ll inspect pads weekly, wash per instructions, and rotate spares to extend life.
Heavy traffic or pets means replacing every 1–2 months. Keep a log so you’ll spot declining cleaning efficiency and act promptly.
Can Robot Mops Use Scented Cleaning Solutions Safely?
Yes, you can usually use scented cleaning solutions safely; however, check your robot’s manual for fragrance compatibility and dilution guidance. You’ll want fragrance-compatible, non-abrasive, low-foaming formulas to avoid residue, sensor interference, or motor damage.
Dilute as recommended, test a small area, and avoid oils or bleach blends. Clean reservoirs and pads regularly to prevent buildup. If vents or sensors clog, stop use and flush with plain water.
Will Robot Mops Damage Unsealed or Natural Stone Tiles?
Yes, robotic mops can damage unsealed tiles and natural stone tiles if you’re not careful. You’ll avoid harm by skipping abrasive pads and using pH-neutral cleaning solutions formulated for stone. Additionally, reducing water dwell time is important. Wring or choose low-moisture modes, test a small area first, and spot-dry grout lines.
If tiles are unsealed, consider sealing them or using dry microfiber-only cycles to protect the surface and prolong tile life.
How Do I Store the Robot Mop Between Deep-Clean Cycles?
Store your robot mop in a cool, dry spot to protect temperature-sensitive batteries and electronics. Keep it on its dock or a hard surface to preserve battery health and avoid uneven pressure on brushes.
Empty dust capacity and water tanks after use, and dry them to prevent mold. Cover the unit to block dust and check for floor gaps or debris before returning it to service so wheels and sensors stay clear.
Can I Run a Robot Mop Alongside a Vacuuming Schedule Automatically?
Yes, you can run a robot mop alongside a vacuum automatically. You’ll set automatic scheduling on each device or use a hub/app that supports multi device integration. Then, sequence tasks to avoid collisions: vacuum first, mop after.
Configure no-go zones, stagger start times, and enable notifications for errors. Test the routine and tweak timing for battery and dock returns. Save the combined schedule for reliable, hands-off floor care.
Conclusion
You’ve got a simple, repeatable routine: pick the right robot mop for your tile, prep the floor by sweeping and spot treating, and set water flow and cleaning mode in the app. Run the robot on a scheduled cycle. Check for stubborn stains or grout buildup and handle those manually as needed.
With regular maintenance of the robot and quick spot cleaning, your tile floors will stay clean, protected, and looking their best.