Steam Cleaning Grout and Tile Technique

Use a Wagner 915e with the small nylon brush and stepped extensions. Fill the tank with distilled water and let the unit heat for approximately 11 minutes. Attach and lock the brush and extensions, engage the lockable trigger for continuous steam, and then hover and scrub along grout lines with moderate pressure until dirty runoff clears.
Rinse each pass, towel or air dry, and inspect for remaining stains. Repeat stubborn areas. Continue for tips on descaling, attachment checks, and tougher grout challenges.
Quick Overview
- Use a Wagner 915e with a small nylon brush and extensions for secure, targeted grout access.
- Fill the tank (preferably with distilled water), plug in, and wait approximately 11 minutes for full steam readiness.
- Lock the trigger for continuous steam; hover the brush over grout, and apply moderate scrubbing pressure.
- Monitor dirty runoff, rinse treated sections down the drain, and stop when discharge clears.
- Rinse and dry the area. Then perform a dry before-and-after check to identify spots needing additional passes.
How to Steam-Clean Tile and Grout Quickly
Want to speed up grout cleaning with steam? You’ll set up a Wagner 915e, fill its tank with distilled water to prevent calcium buildup, and wait about 11 minutes for the red indicator to show readiness. Attach the small nylon brush and any required extensions so you can target grout lines without overworking tile surfaces.
Hover the brush over each grout line. Apply moderate scrubbing while steam loosens dirt, and watch for dirty water discharge as proof of lift. Rinse the cleaned area down the drain immediately to flush loosened grime and assess progress. On small-tile layouts, expect multiple passes per line for visible improvement; work methodically in short sections.
As you go, differentiate staining vs whitening expectations. Steam removes surface staining but won’t bleach grout beyond its original shade. Also, weigh sealing vs regrouting afterward: seal if structural grout is sound; regrout only when joints are damaged.
What You Need: Wagner 915e, Brushes, and Safety Gear
How will you outfit the job? You’ll rely on a Wagner 915e as the primary tool, fitted with a small nylon brush and extension pieces to reach grout lines. Use the unit’s lockable trigger to maintain continuous steam without constant finger pressure. Don’t wander into unused topic ideas or unrelated considerations; focus on equipment and safety.
- Wagner 915e with lockable trigger: reliable continuous steam control and compatible with extensions.
- Small nylon brush head: nonabrasive, effective in grout channels; extensions reach between tiles.
- Hearing protection: recommended; the cleaner runs loud and prolonged exposure risks comfort and concentration.
- Basic PPE: gloves and eye protection to prevent scalds from steam and splatter.
You should avoid discussing tank filling or warm-up procedures here; those belong in prep. Inspect attachments for wear. Secure brush mounts and verify the trigger lock functions before proceeding.
Prep: Choose Water, Fill the Tank, and Warm the Unit
Which water will you use: distilled or tap? Choose distilled to minimize calcium buildup and extend nozzle life; that’s the preferred prep choice for longevity and consistent steam output. If you select tap water, plan a periodic descaling step to remove mineral deposits that will form.
Next, perform tank filling with the unit unplugged, using the manufacturer’s fill port and a funnel to avoid spills. Fill only to the indicated level; overfilling compromises pressure control. Secure the cap firmly.
After tank filling, plug in and power the unit on to allow steam pressure to build. The system typically needs about 11 minutes to reach operational temperature; a red light will indicate readiness. Monitor the unit for stable pressure before beginning work.
Maintain a log of water source and cleaning intervals as part of your prep choices to track when descaling or component checks are required. This methodical approach minimizes downtime and preserves nozzle performance.
Attach the Small Nylon Brush and Extensions Correctly
Once the unit’s at pressure, attach the small nylon brush to the extension pieces so you can reach grout lines without bending or overreaching. You’ll follow a procedural sequence: confirm compatibility with the Wagner 915e, select the needed extension lengths, and clean or replace worn bristles before use.
Lock the brush onto the extension firmly; then connect the assembled extension to the main wand. A secure lock prevents wobble and uneven steam delivery. Use the lockable trigger to maintain continuous steam while you guide the brush. Avoid irrelevant discussion or any unrelated topic during setup. Inspect joints and fittings before operation.
- Verify brush compatibility with Wagner 915e; replace if bristles are fouled.
- Stack extension pieces in a stepped manner for added reach; lock each connection.
- Securely lock brush to extension, then attach to the wand to ensure steadiness.
- Engage lockable trigger for continuous steam during cleaning; recheck fittings periodically.
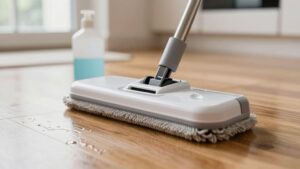
Steam-Cleaning Technique: Hover, Scrub, and Manage Steam Flow
Want to get the grout clean without damaging it? Hover the nylon brush on its extension directly above grout lines, applying moderate scrubbing pressure so steam lifts soil instead of grinding it into the joint.
Wait until the unit is fully heated (about 11 minutes) so you get consistent cleaning temperature. Use the lockable trigger to maintain continuous steam flow; that steady output loosens grime, while your controlled scrubbing dislodges particles.
Watch the dirty water discharge as your primary indicator of soil removal; stop scrubbing when runoff clears. After treating each section, rinse down the drain to confirm loosened dirt is gone before proceeding.
Maintain consistent dwell time and avoid overworking a single spot to reduce the risk of tile discoloration or compromising prior grout sealing. Work methodically in small sections, keeping brush angle and pressure uniform.
This combination — controlled hover, targeted scrub, locked steam — yields repeatable, safe cleaning without mechanical abrasion or uneven results.
Rinse, Dry, and Inspect Cleaned Tile and Grout
How do you verify a successful clean? Rinse inspection starts immediately after steaming: flush the cleaned grout and tile thoroughly with clean water to remove loosened grime and the visible dirty discharge that proves contaminants were lifted. While the surface is still damp, inspect grout lines for residual discoloration or heavy deposits. Moisture highlights remaining issues that need another pass.
- Observe dirty rinse water flow to confirm soil removal and note heavily soiled zones for targeted rework.
- Conduct a damp visual check of grout color and texture to identify stubborn staining during the rinse inspection.
- Perform drying evaluation by allowing air-dry or towel-wipe. Moisture can mask stains, so wait until fully dry to assess true results.
- Compare before-and-after visuals once dry to quantify grout brightening and tile cleanliness and decide if further treatment is required.
Troubleshooting: Stubborn Grout, Loud Operation, and When to Use Chemicals
If stubborn grout resists initial steaming, plan for repeated, controlled passes with the nylon brush and continuous steam. Do not expect a single sweep to remove deeply embedded soil. Use the lockable trigger to sustain steady steam, reduce hand fatigue, and let the heat and agitation work over several passes.
Wait the full readiness time (about 11 minutes) so steam is consistent; short bursts are ineffective and can cause noisy cycling.
If you notice unusually loud operation, inspect for loose attachments. Confirm the nozzle is seated correctly and verify the reservoir meets the recommended fill level to stabilize airflow. Tighten or replace worn fittings before resuming.
Reserve chemical cleaners only as a last resort when multiple mechanical passes fail. Confirm product compatibility with your tile and grout, follow manufacturer directions exactly, and rinse thoroughly after use. Document the sequence you used so you can repeat effective steps and avoid unnecessary chemical exposure.
Frequently Asked Questions
Can Steam Cleaning Remove Mold Spores Completely?
No, steam cleaning can’t guarantee complete removal of mold spores. You’ll kill many spores and microbes with high-temperature steam and improve tile sanitation. However, porous grout can harbor spores that survive or regrow.
For reliable remediation, you’ll combine steam mold treatment with mechanical scrubbing, EPA-registered fungicides or biocides, and drying/ventilation protocols. You should test, repeat treatments, and address moisture sources to prevent recurrence and ensure long-term control.
Is Steam Safe on Sealed Natural Stone?
Yes, is steam safe on sealed stone? Generally, yes if you use low-pressure steam and moderate temperatures. You’ll avoid thermal shock or sealant damage by testing a small area first and keeping the nozzle moving.
Sealed stone resists water penetration; however, steam won’t guarantee elimination of mold spores alone. Combine with mechanical agitation and proper drying. Set maintenance frequency based on traffic and moisture; often every 3 to 12 months.
How Often Should I Steam-Clean Grout for Maintenance?
You should steam-clean grout every 1–3 months for routine steam maintenance. Adjust the frequency by traffic and soil load. High-traffic zones need monthly attention; moderate areas every 6–8 weeks; low-use spaces every 2–3 months.
Use a consistent technique: pre-sweep, test a small area, apply steam at the recommended temperature and pressure, move slowly along grout lines, and follow with quick drying. Record grout frequency and results to refine your schedule.
Can Steam Damage Grout Sealant or Caulking?
Yes, high-temperature steam and prolonged exposure can soften or degrade caulking and some grout sealants. You should control steam impact by using lower pressure, nozzle distance, shorter passes, and cooler steam settings near joints.
Test a small area; avoid direct prolonged steaming on flexible caulk. Reseal if you see softening or bond loss. Proper technique preserves grout longevity and prevents premature sealant failure.
Do Steam Units Sanitize or Kill Bacteria on Tiles?
Yes, steam can sanitize tiles. You’ll achieve high steam sanitation when you use sufficient temperature and contact time. Commercial units reaching 170–212°F with proper dwell typically offer strong surface bacteria kill rate. You’ll methodically move the nozzle, maintaining heat and avoiding rapid cooling.
Note efficacy varies by organism, surface porosity, and soiling. Pre-cleaning and correct steam pressure maximize bacterial inactivation and reproducible sanitation results.
Conclusion
You’ve now got a repeatable, safe method for steam-cleaning tile and grout with the Wagner 915e. Prep properly, use distilled water, fit the small nylon brush and extensions, and warm the unit.
Work systematically: hover, scrub with controlled steam bursts, rinse, squeegee, and dry. Inspect seams for residue and repeat brief passes on stubborn areas. If grout won’t yield, consider targeted chemical pre-treatment per manufacturer instructions and proper ventilation.