Robot Vacuum Battery Replacement Safety Tips
Before you start, power the vacuum off and remove it from the dock. Set up on a flat non-conductive surface and gather screwdrivers, the correct replacement battery, and an anti-static strap. Avoid jewelry, handle the battery by its edges, and confirm voltage matches exactly while mAh is equal or higher.
Unscrew the access plate, disconnect the old pack gently, and fit the new one in the correct orientation. Charge fully while monitoring for heat. Continue for full procedure and troubleshooting tips.
Quick Overview
- Power off the robot and remove it from the dock before starting to eliminate live-current risk.
- Work on a flat, non-conductive surface with good lighting and no loose jewelry to prevent shorts.
- Use the correct replacement battery matching voltage and equal or higher mAh with proper connector and protection circuitry.
- Ground yourself (anti-static strap) and disconnect the old battery by the connector, not by pulling wires.
- Fully charge and monitor the new battery in a cool, dry area. Recycle the old battery per local hazardous-waste rules.
Quick 3‑Step Summary: Replace a Robot Vacuum Battery
Ready to replace the battery? You’ll follow a concise, technical three-step process that emphasizes two word ideas and safety reminders.
First, power down and undock the robot to remove all electrical and charging risks; verify it’s cold and stationary.
Second, remove the bottom plate by unscrewing fasteners; disconnect the old battery with care and install the specified replacement. Confirm voltage and capacity equal or exceed the original mAh rating. Handle connectors gently to avoid damage.
Third, reattach the base plate; secure every screw to restore structural integrity. Then fully charge the new battery before any operational test. Dispose of the old battery per manufacturer guidance and keep replacement parts stored or recycled as the model manual prescribes.
You’ll avoid common failures by sticking to specified components and methodical steps. Treat every action as a controlled mechanical procedure rather than an ad hoc repair.
Prepare: Tools, Workspace, and Safety Checks
Before you start the three-step swap, set up a controlled work area: clear a flat, non-conductive surface, gather the required screwdrivers, the replacement battery (matched voltage and equal-or-higher mAh), an anti-static wrist strap if available, and a small container for fasteners. Power the robot off and remove it from the dock so no current flows.
Do a tools check: confirm drivers fit fasteners, battery specs match voltage and mAh, and the wrist strap works. Follow workspace setup: no metal jewelry, bright lighting, and minimal clutter.
| Item | Purpose | Action required |
|---|---|---|
| Screwdrivers | Access chassis | Select correct bits |
| Replacement battery | Power source | Verify voltage/mAh |
| Anti-static strap | Prevent ESD | Ground yourself |
Handle the battery by edges to avoid short circuits. Document model compatibility before installing. Keep fasteners in the container and reconnect cables securely after reassembly. Proceed only when checks are complete.
Pick the Right Battery: Chemistry, Size, and Authenticity
How will you know the replacement battery is safe and compatible? Start by matching the voltage exactly; differing voltage risks hardware integration failures or fire. Next, check capacity (mAh): choose equal or higher to maintain or improve run time, but avoid oversizing that may not fit the compartment.
Prefer Li-ion chemistries; they offer superior energy density and cycle life. Avoid NiCd cells for robot vacuums. Use only authentic, model-specific batteries. Third-party or generic packs can be an unrelated topic to legitimate safety and often lack necessary protection circuitry.
Physically compare dimensions and connector type to ensure proper fit and contact. Remove the old battery to read its voltage and mAh sticker. Then, verify the replacement’s ratings match. Confirm the replacement includes required protection circuitry (overcharge, overdischarge, short-circuit).
Finally, fully charge the new battery before first use. Monitor initial cycles for abnormal heat, swelling, or performance deviations.
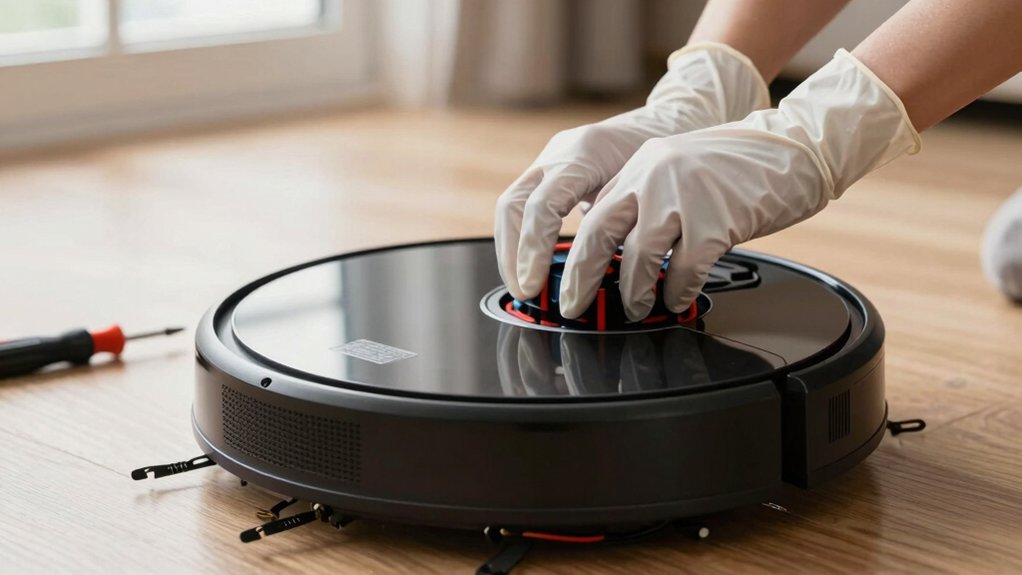
Replace the Robot Vacuum Battery : Step by Step
Want to replace the battery yourself? Follow strict battery safety and these replacement steps. First, power off the vacuum and remove it from the charging dock to eliminate live-current risk. Place the unit on a stable surface. Unscrew and remove the bottom plate, keeping screws organized so you won’t drop or lose them.
Locate the battery, note its orientation, then disconnect the connector carefully; don’t yank wires. Lift the old battery out using both hands and avoid shorting terminals.
Fit the manufacturer-recommended replacement battery into the compartment with the same orientation. Reconnect the terminal firmly until it seats; a loose connection can cause heat or failure. Reattach the base plate and torque screws snugly but don’t overtighten plastic threads.
Return the vacuum to its resting position and follow the device’s initial power procedure. These replacement steps minimize mechanical and electrical hazards. Sticking to recommended parts preserves compatibility and supports long-term battery safety.
First Charge, Safety Tests, Troubleshooting, and Disposal
After installing the new battery, place the vacuum on a cool, dry surface and perform the initial charge while avoiding direct sunlight and heat sources. This lets you verify proper charging behavior and reduces thermal risk. Use the manufacturer charger and confirm battery voltage and mAh match or exceed the original. Monitor indicator LEDs and charging current for anomalies; stop immediately if you detect overheating, swelling, smoke, or erratic charging.
Run a full cleaning cycle to validate docking, run time consistency, and absence of rapid drain or unexpected shutdowns. Inspect docking contacts and charging connectors for cleanliness and secure engagement. Clean with isopropyl alcohol if needed. If faults persist, revert to OEM components or seek professional service to limit DIY risks and avoid voiding warranty impact.
For the old battery, follow local hazardous-waste rules and manufacturer guidance for recycling or disposal. Do not discard in household trash.
Frequently Asked Questions
Can I Use a Battery From a Different Robot Vacuum Model?
You can sometimes use a battery from a different robot vacuum model, but you must verify battery compatibility and connector, voltage, capacity, and firmware requirements.
Using a nonapproved cell can void warranty implications and risk thermal or performance issues. You should consult manufacturer specifications, compare part numbers, and prefer OEM or certified replacements. If uncertain, contact support or a qualified technician to avoid damage or safety hazards.
How Long Does a Replacement Battery Typically Last per Charge?
You’ll typically get 60–120 minutes per charge, depending on motor load and battery capacity. Battery lifespan in usable runtime varies with cleaning mode, suction settings, and age.
Expect runtime to shorten as charging cycles accumulate; most lithium-ion packs retain good capacity for 300–500 cycles before noticeable decline. You should monitor runtime, avoid full deep discharges, and follow manufacturer charging recommendations to maximize battery lifespan and consistent performance.
Are Aftermarket Batteries Covered by My Vacuum’s Warranty?
Usually, they won’t. If you install aftermarket batteries, your manufacturer warranty coverage can be voided because companies require approved parts to ensure safety and performance. You should check your warranty terms and contact the manufacturer before fitting a third-party cell.
If they permit certified replacements, keep receipts and certification details. If not, you’ll assume liability for failures or damage. Any repairs related to the aftermarket battery may be excluded.
Can I Upgrade to a Higher-Capacity Battery Safely?
Yes, you can sometimes upgrade to a higher-capacity battery safely, but proceed cautiously. Check upgrade safety by confirming voltage, connector type, and charging protocol match the original.
Address compatibility concerns: verify physical fit, firmware acceptance, and manufacturer limits to avoid overheating or voided warranty. Use quality cells, follow recommended charging rates, and monitor temperature during initial cycles.
If unsure, consult the manufacturer or a qualified technician before installing.
Where Can I Recycle Old Robot Vacuum Batteries Locally?
You can drop old robot vacuum batteries at designated recycling locations like hazardous-waste centers, electronics stores, or municipal collection events. Check local disposal programs for specifics. You’ll want to package terminals with tape, store cells upright, and transport them separately from metal objects.
Contact your city’s waste department or use Earth911/Call2Recycle online tools to find certified drop-off points. Follow their handling guidelines to prevent shorting, leaks, or regulatory noncompliance.
Conclusion
You’ve learned how to prepare, choose, and install a replacement battery safely. Follow each step methodically: verify compatibility and authenticity; use insulated tools; observe polarity; and secure connections.
After installation, perform the initial charge and run the safety tests outlined to confirm thermal stability and correct voltage. If you detect swelling, overheating, or abnormal current draw, disconnect immediately and dispose of the old cell per local regulations. Always prioritize certified parts and cautious technique.