How to Clean Robot Vacuum Sensors and Cliff Sensors
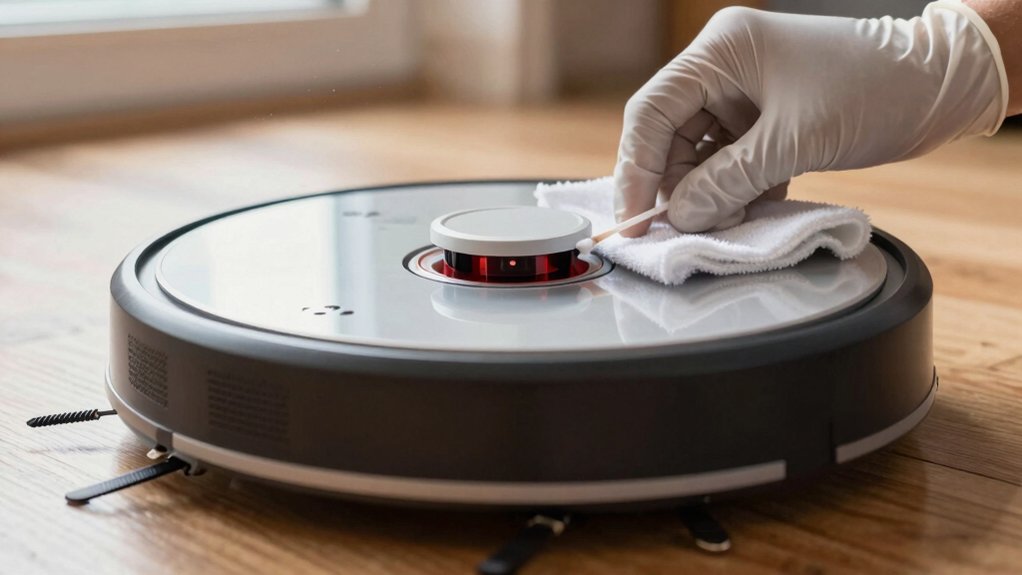
Power off your robot and flip it onto a soft surface. Use a clean, dry microfiber cloth to wipe each cliff sensor window. Then use a small brush or cotton swab to dislodge hair and dust from the openings and edges.
Avoid soaking the sensors. If dampening the cloth, dry-wipe immediately. Check for obstructions like rug fringe or dark mats. Then power on and run a short test cycle to confirm proper behavior. Continue for full steps and troubleshooting.
Quick Overview
- Power off the Roomba and place it upside down on a soft surface before cleaning sensors.
- Wipe each cliff sensor window gently with a clean, dry microfiber cloth; lightly dampen only if manufacturer allows.
- Use a small brush or cotton swab to dislodge dust, hair, and debris from sensor openings and housing edges.
- Visually inspect for obstructions, reflections, dark rugs, or high-contrast edges that can cause false cliff detections.
- After cleaning, power on. Run an app sensor test or recalibration; then perform a short test cleaning cycle to confirm navigation.
Quick Answer: Clean Cliff Sensors to Stop False Detections
Want to stop your robot from falsely sensing cliffs? Power it off and set it upside down on a soft surface. Wipe each cliff sensor opening with a clean, dry microfiber cloth to remove dust and buildup that causes false detections. If your manufacturer allows, lightly dampen the cloth; immediately follow with a dry wipe, and avoid moisture near the sensor housing. Clean all four cliff sensors and inspect sensor windows for obstructions like hair or debris; clear anything that hinders line of sight.
Check nearby sensor placement issues. Move loose rugs or objects that create odd reflections and evaluate rug safety by ensuring high-contrast edges aren’t mistaken for drops. After cleaning, power the robot back on and run a sensor test or recalibration routine to confirm correct responses. Repeat this maintenance regularly; consistent, precise cleaning prevents misclassifying edges and keeps edge detection reliable.
Where Your Roomba’s Cliff and Other Sensors Are (j9+, I, E, 900–500)
Where are the cliff and other sensors on your Roomba? On j9+, i, e, 900–500 series models, the cliff sensors sit along the bottom edge of the robot. Small rectangular windows house infrared detection emitters and receivers that measure distance to the floor and prevent falls. Other sensors include wheel-drop, bump, and wall sensors; these are positioned around the perimeter and underside. Bump sensors are located behind the bumper, wall sensors are near the front edge, and wheel-drop switches are adjacent to the wheels.
Inspect the bottom-edge sensor windows visually before cleaning. Use a dry microfiber cloth to wipe each cliff sensor window gently. If the manufacturer permits, use a lightly damp cloth only for stubborn dust, then immediately dry-wipe to prevent moisture ingress. Clean every 1–2 weeks or sooner in dusty environments.
After cleaning, return the Roomba to its dock and run a test or cleaning cycle in the app to confirm accurate cliff detection and normal navigation.
How to Clean Cliff Sensors and Other Key Sensors : Step-by-Step
Now that you know where the cliff and other sensors sit, you can clean them methodically to keep navigation reliable. Power off the Roomba and place it upside down on a soft surface for cleaning safety. Note sensor placement so you address all windows: front, sides and all four cliff sensors.
Use a small brush or cotton swab to dislodge trapped debris around each sensor window, working gently along edges. Wipe each cliff sensor opening with a clean, dry microfiber cloth to remove dust and debris; only dry wiping is recommended unless your model explicitly allows a damp cloth. If a stubborn spot remains and the manual permits moisture, lightly dampen the cloth, wipe, then dry immediately.
Clean all four cliff sensor windows regularly—every 1–2 weeks or as needed—to prevent false cliff detections near stairs or edges. After cleaning, return the robot to the dock and run a navigation-aware cleaning cycle or sensor check to confirm proper response.
When to Clean and Simple Tests to Confirm Sensors Work
How often should you clean the cliff sensors? Follow a regular cleaning schedule: wipe all four cliff sensor windows with a dry microfiber cloth every 1 to 2 weeks or more often if you see dust, pet hair, or false cliff alerts. Power down the robot, place it upside down on a soft surface, and access the sensor openings.
Start with a dry cloth; only use a slightly damp cloth if your model allows. Then immediately dry-wipe to prevent moisture ingress. Reinsert the robot into the dock and charge.
For sensor testing, run the app’s built-in sensor test or a short cleaning cycle and watch navigation for smooth edge behavior. If your app shows sensor status, confirm each cliff sensor reports OK. To manually confirm, place the powered robot near a low ledge (on the floor, not elevated) and approach the edge. The robot should stop or turn away. If false detections persist, recheck and repeat cleaning before escalating.
Troubleshooting Cliff Errors and Safe Workarounds (Dark Rugs, Persistent Faults, Support)
After cleaning and testing the cliff sensors, address persistent errors methodically: Start by inspecting for dark rugs or matte floors near the robot’s operating area, since low-reflectance surfaces can trigger false cliff detections. If you find them, temporarily move or cover the rug during runs to confirm the surface is the cause.
Next, clean all four cliff sensor windows with a dry microfiber cloth. Then, re-dock and run a navigation test. If errors continue, check sensor housings for moisture; remove any liquid and inspect openings for dust buildup. Carefully blow or brush away debris without liquids.
Avoid forum-suggested hacks like permanently covering sensors; these may create unsafe behavior near stairs. If you still see persistent faults after cleaning and surface checks, note error codes and contact official support for diagnostics. Persistent faults can indicate damaged or miscalibrated sensors that require professional repair or replacement rather than DIY bypasses.
Frequently Asked Questions
Can Moisture Damage the Sensors Permanently?
Yes, moisture damage can permanently harm sensors. If water reaches circuitry, sensor corrosion can occur, degrading performance or causing failures.
Quickly power off the unit, remove batteries, and dry affected areas with a lint-free cloth and gentle airflow. Use isopropyl alcohol sparingly to displace moisture if corrosion is visible.
After thorough drying and inspection, test sensors. Replace them if readings remain erratic or corrosion persists.
Can Aftermarket Brushes Scratch Sensor Windows?
Yes, aftermarket brushes can scratch sensor windows if they’re abrasive or misfit. You should inspect brushes for rough edges, replace worn bristles, and ensure proper alignment to avoid increased brush wear that creates particles causing sensor corrosion over time.
Clean sensor windows with a lint-free cloth and isopropyl alcohol. Check brush compatibility with the manufacturer, and run short tests after installation to confirm sensors remain clear and responsive.
Do Firmware Updates Affect Sensor Behavior?
Yes, firmware updates can change sensor behavior. You’ll see firmware impact through altered calibration routines, threshold adjustments, or new filtering algorithms that improve or reduce sensor accuracy.
After updating, run a quick test: place obstacles and drops, observe responses, and check logs. If accuracy worsens, roll back or contact support.
Keep firmware current for fixes; however, validate sensor performance each time to ensure reliable operation.
Can Pets Trigger False Cliff Detections?
Yes, pets triggers can cause false cliffas. Check and clean sensors regularly, wipe lenses with a microfiber cloth, and remove fur buildup near sensor housings. Keep pets off the vacuum while it runs. Use virtual barriers or no-go zones.
Test after adjustments by placing the vacuum near low edges. Calibrate or update firmware if false cliffas persist. Replace damaged sensors if problems continue.
Is Sensor Replacement Covered Under Warranty?
Yes, sensor warranty and replacement coverage vary by manufacturer and model. However, you’ll often get limited coverage for factory defects within the warranty period.
Check your warranty terms, serial number, and proof of purchase. Then contact support to confirm eligibility. If damage stems from misuse or wear, they’ll likely deny coverage.
If covered, follow the vendor’s authorized replacement procedure to keep the warranty valid and document all communications.
Conclusion
Clean your cliff and other sensors regularly to avoid false drops and navigation issues. Power off the robot, wipe sensors with a dry microfiber or slightly dampened cloth (avoid sprays), and remove stubborn grime with cotton swabs. Ensure vents and bumper edges are clear.
Test on a raised surface and on the floor after reassembly. If errors persist or sensors are damaged, try a reset, update firmware, or contact support. Routine checks prevent most problems.