Wet Dry Vacuum Use and Safety Reference Guide
You should read the manual first, inspect cords, hoses, seals, filters, and attachments, and confirm grounding and ventilation before use.
Pick wet‑rated filters or foam sleeves for liquids and dry filters for solids. Wear goggles, gloves, and a respirator as needed. Clear debris and route cords away from liquids.
Don’t vacuum flammables or unknown hazardous wastes. Empty, rinse, and fully dry the tank and filters after each job.
Continue for step‑by‑step setup, troubleshooting, and maintenance.
Quick Overview
- Read the manufacturer manual first for model-specific parts, safety warnings, and operating limits.
- Inspect cord, plug, hose, seals, and filters before use; document defects and repair or replace damaged parts.
- Use a grounded three-prong outlet, keep power clear of liquids, and stop if heat, buzzing, or sparking occurs.
- Fit the correct filter or foam sleeve for wet pickup. Empty and rinse the tank promptly, and let filters dry before reuse.
- Wear PPE (goggles, chemical-resistant gloves, respirator as needed). Ventilate the area, and control the work zone to exclude bystanders.
Read the Wet‑Dry Vacuum Manual First
Why read the manual first? You’ll find model-specific parts, operation steps, and safety measures documented so you won’t rely on guesswork or an unused topic from generic sources. The manual reduces improper use and misassembly by identifying components and showing correct assembly sequences. Evidence shows this lowers appliance damage and user error.
Consult it as the primary source for limitations and recommended usage instead of nonessential tips found online; manufacturer guidance reflects testing and warranty requirements. You’ll also get clear maintenance routines and timelines for part replacement, supporting equipment longevity and safe operation. Following the manual helps prevent damage to both the vacuum and surrounding property by outlining proper setup and constraints for tasks.
In practice, you should read relevant sections before first use. Refer back when changing attachments or tasks, and prioritize manufacturer instructions over anecdotal shortcuts to maintain safety, performance, and warranty compliance.
Inspect Cords, Hoses, Filters, and Attachments
How thoroughly did you check the vacuum before plugging it in? You’ll perform a systematic cord inspection, verify hose integrity, and confirm filter and attachment condition to reduce electrical, mechanical, and contamination risks. Start visually and tactically: look for cuts, frays, exposed conductors, or damaged plugs. Feel for stiff or weakened sections that indicate internal damage. Inspect hoses for cracks, punctures, or loose connections that compromise suction or can collapse under vacuum.
- Check power and grounding: verify the plug, outlet, and any adapters are intact. Don’t use units with compromised cords or ungrounded connections.
- Assess hose integrity and fittings: ensure seals are tight, couplings undamaged, and no leaks exist that reduce performance.
- Evaluate filters and attachments: clear clogs, replace heavily soiled or moldy filters after wet use, and confirm attachments seat securely to prevent detachment or motor strain.
Document defects and repair or replace parts before operation.
Choose the Right Filter and Accessories for Wet vs. Dry
Choosing the correct filter and accessories depends on whether you’re picking up solids, liquids, or a mix. Using the wrong combination can let moisture reach the motor or clog airflow and cause overheating. For dry debris, you should use a dry filter designed to trap particulates. For liquids, switch to a wet-use filter or fit a foam/sponge pre-filter so moisture doesn’t saturate the dry element.
Your filter selection must match the pickup type: wet-capable filters resist water, can be wrung out, and are replaced when degraded. Accessory pairing matters for efficiency and protection; use a wide floor nozzle for large spills to reduce cycle time. Use a crevice tool for confined wet areas only when a wet filter is installed.
Never run liquids through a dry-filtered path. Liquid can bypass the element and damage the motor. Inspect wet filters frequently and replace or dry them when clogged or saturated to maintain suction and prevent overheating during wet operation.
Set Up Grounding, Ventilation, and PPE
Before you start vacuuming, confirm the unit is grounded, the work area is ventilated, and you’re wearing appropriate PPE so electrical, inhalation, and splash hazards are controlled. Use a grounding setup that includes a three-prong plug into a verified grounded outlet. Don’t use adapters that defeat grounding or modify cords. Keep liquids clear of power sources. Stop if you detect heat or buzzing.
- Ensure grounding setup: inspect cord and plug for damage; verify outlet ground continuity; unplug immediately if you notice damage or odd sensations to reduce shock risk.
- Observe ventilation importance: increase air exchange when cleaning chemicals, fumes, or volatile liquids. Mechanical ventilation or open windows lowers inhalation exposure and aerosol concentration.
- Select PPE: wear safety goggles, chemical-resistant gloves, and a suitable dust or respirator mask based on contaminant type. PPE complements ventilation and grounding to control exposure.
Follow these measures consistently. Evidence shows layered controls reduce incident probability.
Prepare the Work Area and Protect Surfaces
With grounding, ventilation, and PPE in place, prepare the work area to minimize mechanical and contamination risks: clear fragile items and large debris. Lay down a drop cloth to catch splashes during wet pickup, and position the vacuum on a stable, level surface away from edges to reduce tipping and electrical exposure.
You’ll remove loose debris and large items first to prevent pump and filter obstruction; evidence shows particulate buildup increases failure rates and reduces suction efficiency. Protect fragile surfaces by relocating delicate objects or covering them with padding and additional drop cloths. This limits secondary contamination and impact damage.
Establish temporary barriers or signage to exclude children and pets; this reduces interference and accidental contact. Route extension cords and power cords to avoid liquid paths and trip hazards, and verify outlets remain dry. These steps systematically lower mechanical, electrical, and contamination risks, creating a controlled work zone that supports safe, effective vacuum operation without compromising equipment or nearby surfaces.
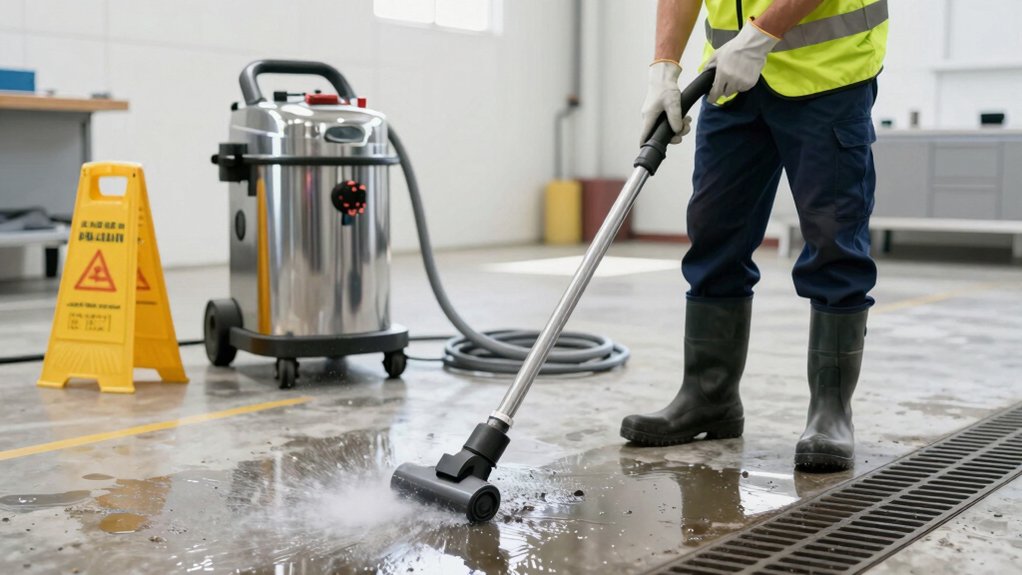
Safe Wet‑Dry Vacuum Techniques for Liquids and Debris
How should you approach wet and dry pickup to minimize clogs, motor stress, and contamination? You’ll use designated wet-dry attachments, inspect components, and follow strict handling steps. Wet filtration must be applied for liquid work. You should switch to the foam sleeve or wet filter and avoid running the motor dry to prevent damage.
- Inspect and select: Check the filter and tank for damage. Choose the wide liquid nozzle or crevice tool as appropriate to maximize pickup and reduce clog risk.
- Operate and contain: Use wet filtration for liquids. Keep the power cord and outlets clear of standing liquid. Stop if performance drops to prevent motor stress.
- Empty and secure: Wear gloves when handling wet debris. Transfer contents to a sealed container to ensure debris containment. Rinse the tank after liquid pickup to prevent odor and biological growth.
These evidence-based steps reduce mechanical failure and cross-contamination while maintaining operational efficiency.
Don’t Vacuum These Hazardous Materials and Substances
Those wet-dry practices reduce clogs and contamination, but they won’t protect you from certain materials you must never vacuum. You must avoid hazardous liquids such as gasoline, kerosene, solvents, acetone, paint thinners, and drain cleaners. These can ignite, explode, corrode internal components, and emit toxic fumes that compromise seals, motors, and air quality.
Don’t use the vacuum for caustic chemicals (strong acids or bases); they degrade hoses, gaskets, and filters, creating leakage and exposure risks. Never vacuum mixtures or residues containing bleach, ammonia, or chlorine cleaners because they can form toxic chlorine gas when they interact with other substances.
Also, don’t vacuum hazardous biological waste—bloodborne pathogens or unknown liquids—without containment and appropriate PPE. The risks of cross-contamination and infection are significant. When assessing tasks, identify incompatible materials and consult safety data sheets. If a material is combustible, corrosive, reactive, or biologically hazardous, select specialist cleanup methods and trained professionals rather than relying on a wet-dry vacuum.
Troubleshoot Common Wet‑Dry Vacuum Problems
Why is your wet‑dry vacuum underperforming or behaving oddly? Start by checking obvious sources: a full collection tank, hose or wand clogs, or a dirty or saturated filter. Those issues create airflow restriction that reduces suction and can cause motor overheating. Power off and unplug before inspecting.
- Check suction loss: empty tank, clear hose or wand blockages, and replace or clean filters. Use wet/dry specific filters for wet pickup to avoid damage.
- Diagnose motor overheating: overheating typically signals airflow restriction from clogs, a full debris cup, or a contaminated filter. Let the motor cool; then inspect and remedy before restarting.
- No start or persistent water: verify the power cord, outlet, switch, and safety trips. If water remains in the drum after wet use, inspect seals and gaskets for leaks and replace faulty parts.
Follow each step methodically. Document findings and only restore power once components are dry and correctly reassembled.
Empty, Clean, and Dry the Tank After Use
After you’ve checked for clogs, full tanks, and filter issues, make emptying and cleaning the drum a standard step to prevent odors, mold, and performance loss. You should empty tank contents promptly after each session; data and experience show residues and standing liquid accelerate microbial growth and odors.
Drain completely for wet pickup jobs, then rinse with clean water and mild soap to remove film and particulates. Inspect seams and fittings for trapped debris.
Remove filters per the manual, clean them, and allow them to dry fully before reinstalling to maintain filtration efficiency. After washing, wipe internal surfaces and leave the lid open or partially ajar to ventilate; this encourages complete drying and reduces mildew risk.
For short-term holding, keep the unit in a dry area away from direct sunlight and ensure dry storage conditions to prevent corrosion and odor recurrence. These steps preserve performance and reduce the need for corrective maintenance.
Store, Maintain, and Schedule Replacements
How often should you inspect and store your wet/dry vacuum to keep it reliable and safe? Inspect monthly and follow strict tank storage and cord safety practices: empty and wash the tank with warm water and mild soap after every use; dry completely before reassembly; and store the unit unplugged in a dry, shaded area to minimize mold and bacterial buildup.
- Inspect monthly: check hoses, seals, filters, and the motor for wear or damage; log findings and schedule repairs if leakage or performance loss appears.
- Replace proactively: use the correct wet-cleaning filter and replace it after significant liquid exposure; replace worn components immediately to protect motor longevity.
- Cord safety and storage: replace frayed cords promptly; coil cords without sharp bends; and avoid damp storage locations to prevent electrical hazards.
These steps reduce odor, contamination, and failure risk. They support predictable maintenance intervals and evidence-based replacement decisions.
Frequently Asked Questions
Can I Use a Wet‑Dry Vacuum to Pump Water Out of a Basement?
Yes, you can use a wet/dry vacuum for water removal in a basement; however, it’s best for small to moderate volumes and shallow flooding. You’ll need a model rated for liquid pickup, use the proper float valve or filter, and empty the tank frequently.
For deep or continuous flooding, a submersible pump is more effective and safer. Always follow manufacturer guidelines and ensure electrical safety around water.
Can I Run the Vacuum Continuously for Extended Flood Cleanup?
You can run a wet-dry vacuum continuously, but you shouldn’t without precautions. Continuous operation safety requires monitoring motor temperature, float valves, filter condition, and water level to prevent overheating, clogging, or electrical hazards.
Extended cleanup risks include motor burnout, reduced suction, and shock from damaged cords or contaminated water. Schedule periodic shutdowns to inspect and empty the tank. Use GFCI protection and follow manufacturer duty-cycle recommendations to minimize failure.
Are Battery‑Powered Shop Vacs as Safe as Corded Models for Liquids?
Yes, battery‑powered shop vacs can be as safe as corded models for liquids when used correctly. You’ll need to confirm the manufacturer’s IP ratings, battery enclosure integrity, and liquid sensor protections. Battery chemistry and ventilation affect risk.
Maintain seals, avoid submersion, and use GFCI on corded units when available to compare corded safety. Inspect for damage, follow charging and wet‑pickup instructions, and replace compromised batteries or cords promptly.
Can I Vacuum Hot Ashes or Embers From a Fireplace?
No, you shouldn’t vacuum hot ashes or ember embers. Hot material can ignite filters, tanks, or hoses; this can cause fire and damage. Wait until ashes are completely cold, ideally 24–48 hours. Then use a shop vac with a spark-resistant metal container or a specifically rated ash vacuum with a metal heat-resistant filter.
Empty the vacuum outdoors into a noncombustible bin and monitor for smoldering to minimize residual fire risk.
How Do I Dispose of Hazardous Waste Collected by the Vacuum?
You should treat hazardous waste as regulated material and follow approved disposal methods immediately. Verify the vacuum’s collected contents, segregate incompatible wastes, and store them in labeled, sealed containers.
Contact your local hazardous waste authority or a licensed disposal service for pickup or drop-off; they’ll advise on transport paperwork and treatment options. Keep records of manifests and receipts.
Don’t mix household trash with hazardous waste or attempt on-site incineration without permits.
Conclusion
You’ve followed the manual, inspected components, matched filters and accessories to wet or dry tasks, and set grounding, ventilation, and PPE. You’ve prepared the area, avoided prohibited materials, and troubleshot issues.
Now prioritize post-use procedures: empty, clean, and fully dry the tank. Then store and log maintenance and filter replacement schedules. Consistent adherence to these steps reduces risk, preserves equipment performance, and is supported by manufacturer safety data and best-practice guidance.