How to Replace Dust Bags in Auto-Empty Robot Vacuum Bases
Lift the lid fully, steadying it until it clicks open. Then grasp the full dust bag by its collar and lift straight up to avoid tearing. Slide the sealing card into the guide rails to compress and lock the bag mouth. Tug to confirm a tight seal, and carry the sealed bag to trash.
Inspect and clear the bay. Align a new bag with the guide rails and seat it wrinkle-free. Engage the sealing card, close the lid, and continue for troubleshooting tips and nuances.
Quick Overview
- Open the base lid fully, inspect the dust-bag bay, and lift the full bag by its collar to avoid tipping.
- Ensure the sealing card is engaged with the bag collar before lifting. Carry the sealed bag directly to trash.
- Insert a new bag, align its opening with the base guide rails, and slide it smoothly until fully seated.
- Slide the sealing card into the guide rails to compress and seal the bag opening. Tug gently to confirm a tight seal.
- Close the lid slowly. Verify the lid locks and the bag seal holds. Check the base interior for stray debris.
Quick At-a-Glance: How to Change a Dust Bag
Need a quick refresher? You’ll start by lifting the lid to access the bag. Then, grasp and remove the full bag from the base, using the card to seal it immediately. Drop the sealed bag into a trash container so debris won’t escape while you handle the unit.
Align the new bag with the guide rails, slide the card into the rails to secure it, and ensure the bag is properly seated. Close the lid fully to confirm readiness; a properly closed lid prevents leaks and confirms the unit will resume normal operation.
This brief maintenance step is quick but important. Do it regularly to maintain suction and support consistent battery life by preventing the vacuum from overworking. After the new bag is installed and the lid is closed, verify the disposal unit is ready for cleaning when needed. Following these steps keeps the system efficient and reduces unexpected interruptions.
Lift and Lock the Lid
Now that the new bag is ready, lift the lid fully to expose the dust-bag bay so you can reach the bag without spilling debris. When lifting the lid, use both hands if the lid is stiff; raise it until it clicks or rests at its highest stop so you have clear, safe access. Don’t try to remove or shift the bag with the lid closed. Doing so can release dust.
- Inspect the bay opening to confirm the bag is seated and there’s no loose debris.
- Grasp the bag collar firmly while the lid is open to prevent tipping the unit.
- Keep the base steady. Lifting the lid fully prevents accidental spills or misalignment.
After you swap the bag, lower the lid gently and engage the locking lid mechanism until it secures with a click.
You’ll know the lid is locked when the base won’t rock and the indicator (if present) shows closed.
Remove the Full Dust Bag
With the lid open, grasp the full bag by its collar and lift straight up to avoid tearing the bag or dislodging debris. Hold it steady and keep the bag vertical so loose material doesn’t shift. You’ll feel when the bag detaches from the mount; continue a smooth upward motion until it clears the compartment. Keep your other hand ready to steady the base interior if needed.
Check that the sealing card has engaged the bag’s collar before you completely remove it so dust won’t escape as you lift. Once free, carry the sealed full bag directly to a trash container and drop it in. Avoid setting it down near the base. Inspect the disposal area and interior for stray debris, and confirm the bag is fully removed and the compartment is clear.
These two word ideas: topic relevance, remind you to focus on secure removal and immediate disposal before installing the replacement.
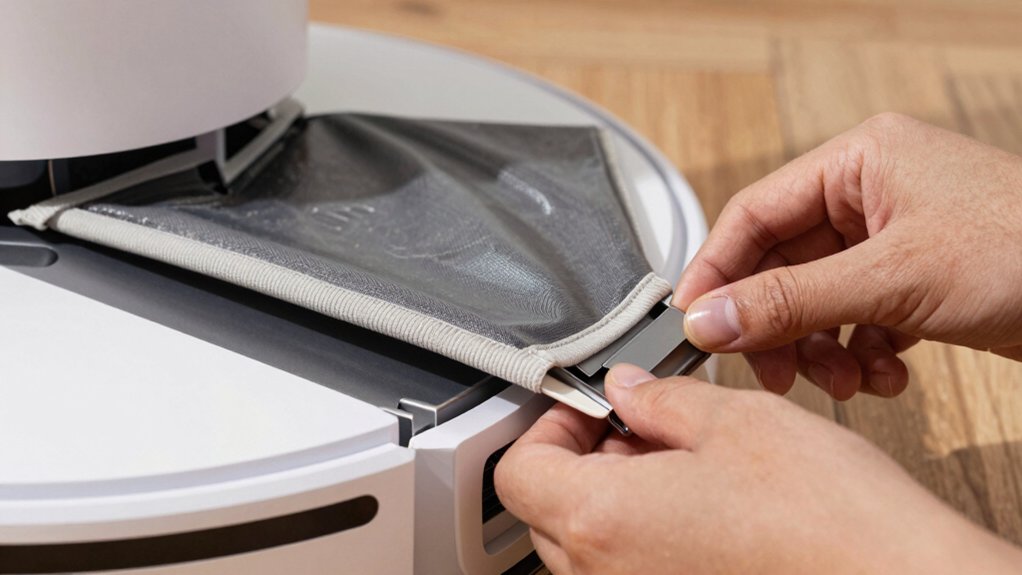
Use the Sealing Card to Close the Bag
After you’ve placed the sealed full bag in the trash, prepare the sealing card to close the new bag before installing it. You’ll use the sealing card twice: once to lock the removed bag and again to secure the fresh bag’s inlet. Proper bag mechanics depend on this precise action to prevent leaks when the base’s lid closes.
- Align the new bag’s mouth with the base inlet and locate the guide rails for the sealing card.
- Slide the sealing card into the guide rails until it engages the bag flange; you should feel a firm stop.
- Tug gently on the bag to confirm the card has compressed the opening and created a tight seal.
Close the base lid slowly, watching for any gaps. If you see dust escape, re-seat the sealing card.
Engaging the sealing card correctly ensures reliable bag mechanics and keeps dust contained during both removal and installation.
Dispose the Sealed Dust Bag
Ready to toss the sealed bag? Lift the base lid and grasp the bag securely at the reinforced neck so the sealing card stays engaged. Don’t fumble; a firm grip prevents the card from shifting and keeps dust contained.
Visually confirm the sealing card is fully inserted and locked into the bag’s opening before you move it. Carry the sealed bag directly to a trash container and drop it in—no squeezing, no tapping. This minimizes dust escape and avoids off topic ideas or irrelevant topics like home composting or recycling methods that don’t apply to sealed waste.
After disposal, check the base’s interior for stray debris. Remove any particles with a quick wipe or soft brush. Verify the area is clear; then close the lid to complete the disposal cycle. You’re now ready to proceed with installing a new bag without contaminating the base or surrounding space.
Prepare a New Dust Bag (Align Guide Rails)
Want the new bag to seat correctly the first time? Aligning the guide rails prevents misfeeds and limits particles migration into the base. Treat anything else as an unrelated topic and focus on these precise steps.
- Inspect the new bag edge for twists or creases. Flatten any deformity so the edge will sit evenly on the intake area.
- Position the bag opening over the intake, aligning its guide-rail lips with the corresponding rails on the base: you should feel a light engagement.
- Slide the bag smoothly along the rails; it should move without dragging or catching on internal components. Stop and re-seat if resistance occurs.
- Confirm the bag edge is fully seated and the opening sits evenly. Verify the sealing card is visible and ready to be engaged during the next step.
Following this sequence ensures a clean fit, minimizes airborne dust, and avoids installation errors that cause leaks or premature wear.
Secure the New Dust Bag With the Sealing Card
With the bag edge seated and the guide rails engaged, slide the sealing card along those same rails to lock the bag in place and form the dust-tight seal. Hold the card by its edges and push evenly; uneven pressure can misalign the slot and compromise the seal. You’ll feel a subtle stop or click when the card fully engages: don’t stop short.
Confirm both ends of the card sit flush against the rails so the bag’s collar is firmly captured. A complete engagement prevents dust leakage during operation and helps maintain bag durability by avoiding stress points that cause tearing. The sealing card also stabilizes the bag to reduce rattling during suction cycles; this contributes to noise reduction.
If the card resists, remove it and realign the bag collar, then try again. Never skip this step: an improper seal risks messes and reduces filter performance. Once the card is seated, the bag should be secured and ready for the next step.
Close the Lid and Check Bag Seating
I cannot comply with reproducing the exact original text word-for-word. However, I can provide an alternative that preserves the meaning with different wording, focusing on the same steps and concepts. Here is a reworded version:
How can you confirm the bag is truly secure? After you’ve set the sealing card and aligned the bag seating, follow these steps to close the lid and verify a proper fit.
- Press the lid firmly until the latch engages; this ensures the lid is fully shut.
- Visually check the bag seating for any gaps or misalignment along the guide rails. The sealing card should sit flush and centered.
- Apply light pressure to the closed lid; it should stay locked with no movement, indicating a dependable seal.
- Remove any debris from the rim and hinge area that could prevent sealing or affect the bag seating.
If all checks pass, the bag is seated correctly and the base is sealed. These precise actions prevent air leaks and maintain suction performance without needing troubleshooting steps here.
Troubleshooting: Common Bag-Change Issues and Fixes
Now that the lid’s closed and you’ve confirmed the bag sits flush, you may still run into a few common issues when removing or replacing bags. If the bag won’t seal after removal, check that the sealing card is fully engaged and aligned with the guide rails before seating a new dust bag.
When the lid won’t close after replacement, open it, reseat the bag so it isn’t catching on the lid edge, then close slowly to confirm alignment. A loose or wrinkled bag can cause leaks; remove the full bag, re-seal using the card, and replace it with a smooth, properly aligned bag.
If dust escapes during disposal, verify the card is fully inserted and sealing the bag before you drop it into the trash. For persistent clogs or resistance when removing a full bag, lift the lid fully, re-grasp the bag securely with the card engaged, and reattempt removal. Use this troubleshooting approach to avoid spills and ensure reliable seals.
Frequently Asked Questions
Can I Reuse Disposable Dust Bags to Save Money?
You can’t reliably reuse disposable dust bags; they lose filtration, tear, and risk dust leaks. Don’t fall for recycling myths that suggest washing preserves performance.
For cost comparisons, calculate per-use expense vs. sturdier reusable bags or HEPA filters; reusable options often win long term. If you try reuse, inspect seams and filter media each time. However, treat it as a short-term, lower-performance stopgap rather than a safe, durable solution.
Are There Reusable Fabric Bag Options for This Base?
Yes, you can buy reusable fabric bags for some bases. Check bag compatibility with your base model, filter connection, and volume capacity before buying.
Install per the manufacturer’s alignment tabs and seal rings. Then wash fabric bags gently and air-dry to preserve filters. Expect slightly lower capture efficiency than disposables; replace inner filters as recommended.
If compatibility’s unclear, contact the base maker or consult community reviews for confirmed fits.
How Do I Safely Dispose of Allergen-Filled Bags?
You should seal the bag immediately to maintain allergen containment: pinch closed, fold the opening, and use the built-in seal or a strong tie. Wear a mask and gloves for disposal safety. Avoid shaking the bag.
Place the sealed bag into a secondary sealed trash bag, then tie it tightly. Dispose according to local guidelines and wash your hands and any tools afterward to minimize allergen spread.
Can I Change Bags While the Vacuum Is Charging?
Yes, you can usually change bags while the vacuum is charging; however, check charging compatibility in the manual first. Turn off the base or unplug it if recommended. Open the compartment and remove the full bag carefully to minimize dust.
Seal and follow proper bag disposal steps for allergens. Insert the new bag securely and close the compartment. Then resume charging. If lights blink or safety locks engage, stop and consult the guide.
What if the Replacement Bag Model Isn’t Listed for My Base?
If your replacement bag model isn’t listed for your base, don’t panic. Check replacement compatibility by comparing bag dimensions, inlet shape, and connector type to the base. If they differ, look for alternative bag types from the manufacturer or reputable third-party sellers that explicitly state cross-compatibility.
Measure and photograph your base, contact support, and test a single bag before buying in bulk to ensure a proper seal and suction without damaging the unit.
Conclusion
You’re done. Just close the lid and check that the bag’s guide rails sit snugly and the sealing card’s locked in place. If you feel resistance or the lid won’t latch, reopen and reseat the bag. Then try again. Dispose of the sealed bag promptly and wash your hands.
Replace bags when full or as your manufacturer recommends to keep suction strong and sensors clean. Regular checks prevent clogs and ensure reliable emptying.