How to Clean Robot Vacuum Roller Brush and End Caps
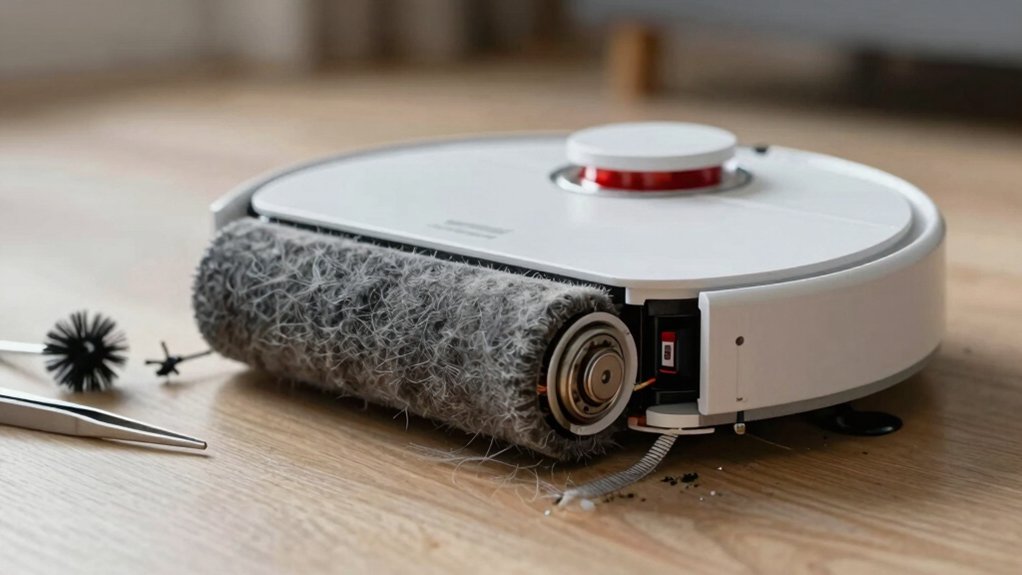
You’ll remove the roller housing by pressing the plastic tabs and lifting the bracket. Then, lift and slide each roller end free, noting right/left orientation. Inspect caps and roller for hair, cracks, and bristle wear. Cut wrapped hair with the “Mind to Blade” tool along the groove; use a pocket knife or picks for tight spots.
Clear housing and filters, and reseat the roller drive end first until it clicks. Continue for step‑by‑step reassembly and testing.
Quick Overview
- Remove the frame by pressing plastic tabs, lift the bracket, and slide the roller out, noting left/right orientation.
- Cut wrapped hair along the roller grooves with the “mind to Blade” tool, making one long pass. Repeat if needed.
- Use picks, tweezers, and a soft brush to remove cut hair from the roller shaft, end caps, and housing.
- Inspect and rotate end caps. Check for smooth movement, hair in shafts, cracks, or deformation.
- Reinstall drive end first. Ensure the roller sits flush with no wiggle, snap the frame closed, and run a short test cycle.
Quick Answer: How to Clean a Robot Vacuum Roller Brush
Wondering how to quickly restore brush performance? For a quick answer on roller maintenance, start by removing the roller brush: press the side and upper-edge tabs, lift the plastic bracket, then detach the roller by lifting from the right side first so you preserve orientation for reinstallation.
Inspect the roller thoroughly for long hair and dirt buildup. These often remain after superficial cleaning and reduce performance. Use the blade tool labeled “mind to Blade” inside the top lid: make one long pass the full length of the brush to cut through hair. Add a second pass only if required.
After cutting, swipe the roller with the blade tool to gather dust and debris. Collect removed material for disposal and return the blade tool to its compartment to avoid loss. Reinstall the roller in the correct orientation and ensure the frame cover seats properly with the bottom noses.
Verify secure placement by gently pulling on the frame before returning the robot to service.
Tools and Parts Checklist for the Roller Brush
Which items do you need before starting roller-brush maintenance? Prepare the roller brush assembly, both end caps removed or ready for inspection, and the plastic frame/bracket that secures the brush. Have the blade tool labeled “mind to Blade” available for cutting ribbon hair and embedded strands; its single full-length pass design is required for controlled cuts.
Keep a small container or bag for collected hair and dust bunnies to avoid recontamination. Use a soft brush or compressed air to clear residual dust after cutting. Keep a lint-free cloth and isopropyl wipe for cleaning end caps and contact areas. Have small picks or tweezers for snagged fibers and a flashlight to inspect corners and orientation markers.
Keep spare rubber seals or a replacement roller brush if wear is visible. Finally, ensure you have gloves and a flat work surface; these minimize contamination and make reassembly checks faster without detailing removal or lift steps.
Remove the Roller Brush Safely (Tabs, Bracket, Lift Order)
With your tools and parts staged and end caps ready for inspection, start by locating the plastic tabs along the side and upper edge of the brush housing. Press those tabs firmly to detach the housing; tool tips: use a flat spudger or fingernail to avoid damaging plastic. Once tabs release, lift the plastic bracket straight up to expose the roller brush.
Follow the lift order: clear the right side first, then the left. Lift the right-end corner slightly and slide the brush free; then lift the left. Note corner orientation differences as you remove the roller so you can reinstall it correctly.
Safety reminders: keep fingers away from sharp bracket edges and support the assembly to prevent it from snapping closed. Set the roller on a clean surface with its right and left ends aligned as removed. You’ll use these orientation notes during reinstallation before you reassemble the device.
Inspect Roller and End Caps for Hair, Dust, and Damage
How do you know the brush and caps are ready for cleaning? Inspect visually and by hand: rotate the roller, feel for resistance, and scan surfaces for hair buildup, dust accumulation, and signs of wear.
Check for long hair wrapped around the roller shaft and trailing into the end caps; trapped strands will impede rotation. Examine bristle condition and roller surface for fraying, missing sections, or cracks that indicate replacement rather than just cleaning.
Inspect end caps for hair wrap, seated debris, or end cap damage such as cracks or deformation that can cause misalignment or vibration. Document any issues before proceeding: note persistent resistance, concentrated debris at roller ends, and visible end cap damage.
If debris is minimal and parts are intact, proceed to cleaning. If you find frayed bristles, extensive hair buildup, or damaged end caps, prepare replacement parts and prioritize thorough removal and inspection steps.
Cut and Remove Long Hair Using the “Mind to Blade” Tool
Now that you’ve inspected the roller and end caps and confirmed that parts are intact, it’s time to cut and remove long hair using the “Mind to Blade” tool stored under the top lid. Retrieve the labeled blade tool, hold it perpendicular to the roller, and align the edge with a roller groove.
Insert the blade into the groove and make one long pass along the roller’s full length using a steady blade technique to sever embedded hair. If strands remain, make a second pass through the same area for complete cutting. For tight end sections that resist the Mind to Blade, switch to a pocket knife only as needed to address localized clumps.
After cutting, use the blade tool to swipe along the roller to collect loose hair and dust, depositing debris into a waste container. Keep the procedure focused on these two word discussion ideas: tool placement and cut consistency to ensure efficient, repeatable results.
Clean End Caps and Stubborn Hair With Knife and Picks
Feeling stuck on stubborn hair around the end caps? Use the “mind to Blade” tool in the top lid to make controlled cuts along the cap edges and brush grooves. Make one long pass along the full length; then repeat if hairs remain.
For tight end sections, switch to a pocket knife and make short, shallow cuts aimed at the hair bundle. Avoid the plastic edge. After cutting, swipe the blade tool across end caps and crevices to dislodge dust and dust bunnies.
Use picks to extract remaining strands from the axle openings and cap seams. Return the blade tool to the robot vacuum to avoid loss before you proceed.
- Make a full-length pass with the blade tool; repeat if needed.
- Target tight corners with a pocket knife; protect the plastic edge.
- Use picks to pull remaining fibers from axle holes and seams.
Verify end caps are free of hair before reseating the roller brush and continuing reassembly.
Reinstall the Roller Brush (Correct Left/Right Orientation) and Snap Cover
Which end is which? Confirm the left and right ends differ and orient the roller so the marked right end matches the vacuum’s right-side receptor. Place the roller into the housing; seating the drive end first then lowering the opposite end into its slot. Before you reinstall the roller fully, verify it sits flush and can’t be wiggled. Any play will block the frame from closing.
Align the frame cover by lining the bottom noses with the matching slots on the housing. Press the cover’s top end straight down until you hear an audible click: this indicates the cover has engaged. If it resists, lift and recheck roller orientation. Do not force the frame closed.
After you snap the cover in place, grasp the assembly and gently pull the frame to confirm secure placement. Only operate the vacuum once the roller is fully seated and the cover is snapped; ensuring correct alignment prevents damage and maintains proper brush rotation.
Test the Vacuum and Troubleshoot Common Post‑Cleaning Issues
With the roller and cover properly seated, power the vacuum and run a short test cycle to confirm the brush spins freely and the frame stays tight. Listen for grinding or scraping that signals robot hair or debris lodged in end caps or between brush and housing. If you hear noise, power down and recheck end-cap seating, brush orientation, and that all clips fully engage.
If the brush stalls or feels loose, re-open the cover and verify left/right orientation and full clicks. If end caps bind or don’t rotate smoothly, remove caps, clear robot hair and trapped debris, then reassemble and re-test.
If pickup is inconsistent across rooms, run a second pass and perform additional debris removal from housing, filters, and intake. Confirm smooth cap rotation and absence of rubbing resistance.
Repeat inspection until rotation, noise level, and cleaning performance meet expected norms. Document any persistent faults for service.
Frequently Asked Questions
How Often Should I Replace the Roller Brush Entirely?
You should replace the roller brush every 6–12 months depending on wear and performance. Check for frayed bristles, reduced suction, or motor strain; those signs demand sooner replacement timing.
When swapping brushes, verify end cap compatibility with your model to ensure proper fit and seal. Remove and inspect end caps for damage, clean mating surfaces, then install the new brush per manufacturer torque and alignment specs to avoid premature failure.
Can I Wash the Roller Brush in a Dishwasher?
No, you shouldn’t wash the roller brush in a dishwasher. Most roller brush components aren’t rated as washable components for dishwasher safety. Heat, detergent, and agitation can warp plastic, delaminate adhesive, and damage bearings.
Instead, detach the brush, remove hair and debris, hand-wash bristles gently with mild soap and water, rinse, and air-dry fully. Check the manual for specific washable components and bearing maintenance before reinstalling to avoid damage.
Are Replacement End Caps Model-Specific?
Yes, replacement end caps are usually model-specific. You’ll check replacement parts listings and your vacuum’s model number, compare part codes, and confirm compatibility questions with the manufacturer or retailer.
Order only matched caps or kits, or use verified cross-reference charts. When installing, follow the procedure: remove the old cap, inspect bearings and seals, fit the new cap, and test the roller for smooth rotation and proper seating.
Will Lubricant Improve Roller Rotation?
Yes, proper lubricant effectiveness can improve roller rotation impact when applied correctly. You’ll first remove the roller and end caps, inspect bearings and shafts for debris or wear. Then, apply a small amount of dry Teflon or silicone-based lubricant to metal-on-metal contact points.
Don’t use oil-based or grease that attracts dust. Reassemble and spin the roller by hand to confirm smoother rotation and consistent free-play before reinstalling.
How Do I Dispose of Tangled Hair Hygienically?
You should gather tangled hair with gloves or a tissue, using a comb or tweezers to detangle and lift strands into a sealable bag.
Brush or scrape remaining debris into a disposable paper towel. Then insert both into the bag and seal. Sanitize tools and your hands with alcohol or soap and water.
Label or mark the bag if needed for trash protocols. These tidying techniques ensure hygienic hair disposal.
Conclusion
You’ve now removed, cleaned, and reinstalled the roller brush and end caps correctly. Run a quick functional test to confirm free rotation, suction, and brush spin. Listen for unusual noises, and watch for wobble.
If problems persist, recheck end-cap seating; hair caught under bearings; or damaged parts. Replace as needed. Regularly repeat this procedure every 1–3 months depending on use to maintain performance and prevent motor strain.